![]()
FAIR publication of eDNA results
A sequence (and/or raw sequence data) with coordinates and a timestamp is a valuable biodiversity occurrence that can be useful beyond its original purpose. To realize this potential, DNA-derived data must be discoverable through biodiversity data platforms (see more from Abarenkov et al., 2025).
FAIR (Findable, Accessible, Interoperable, and Reusable) publication of eDNA results can be achieved by depositing samples (with metadata) and sequencing data in public repositories such as European Nucleotide Archive (ENA), PlutoF and GBIF. This section describes the steps for publishing DNA-derived data in these repositories.
Uploading sample records to ENA
ENA (European Nucleotide Archive) is an internationally recognized public repository for nucleotide sequence data and associated sample metadata, ensuring your data is FAIR.
If the data is already registered in PlutoF , it can be uploaded to ENA using the Publishing Lab in PlutoF (see section Registering samples in PlutoF and PlutoF GO).
Note
If the data is not registered in PlutoF,
it can be uploaded to ENA manually (see ENA documentation).
When submitting metabarcoding data from environmental samples, then tax_id value is 256318; and scientific_name is metagenome.
Using the Publishing Lab in PlutoF, users can submit sample records to the ENA database. The PlutoF platform acts as a broker for ENA, utilising its programmatic Webin submission service for sample data submission. The resulting BioSamples (ENA IDs) identifiers are stored in PlutoF alongside the original sample records.
All samples within a selected study (BioProject) can be submitted together, and the dataset can be updated later by re-publishing.
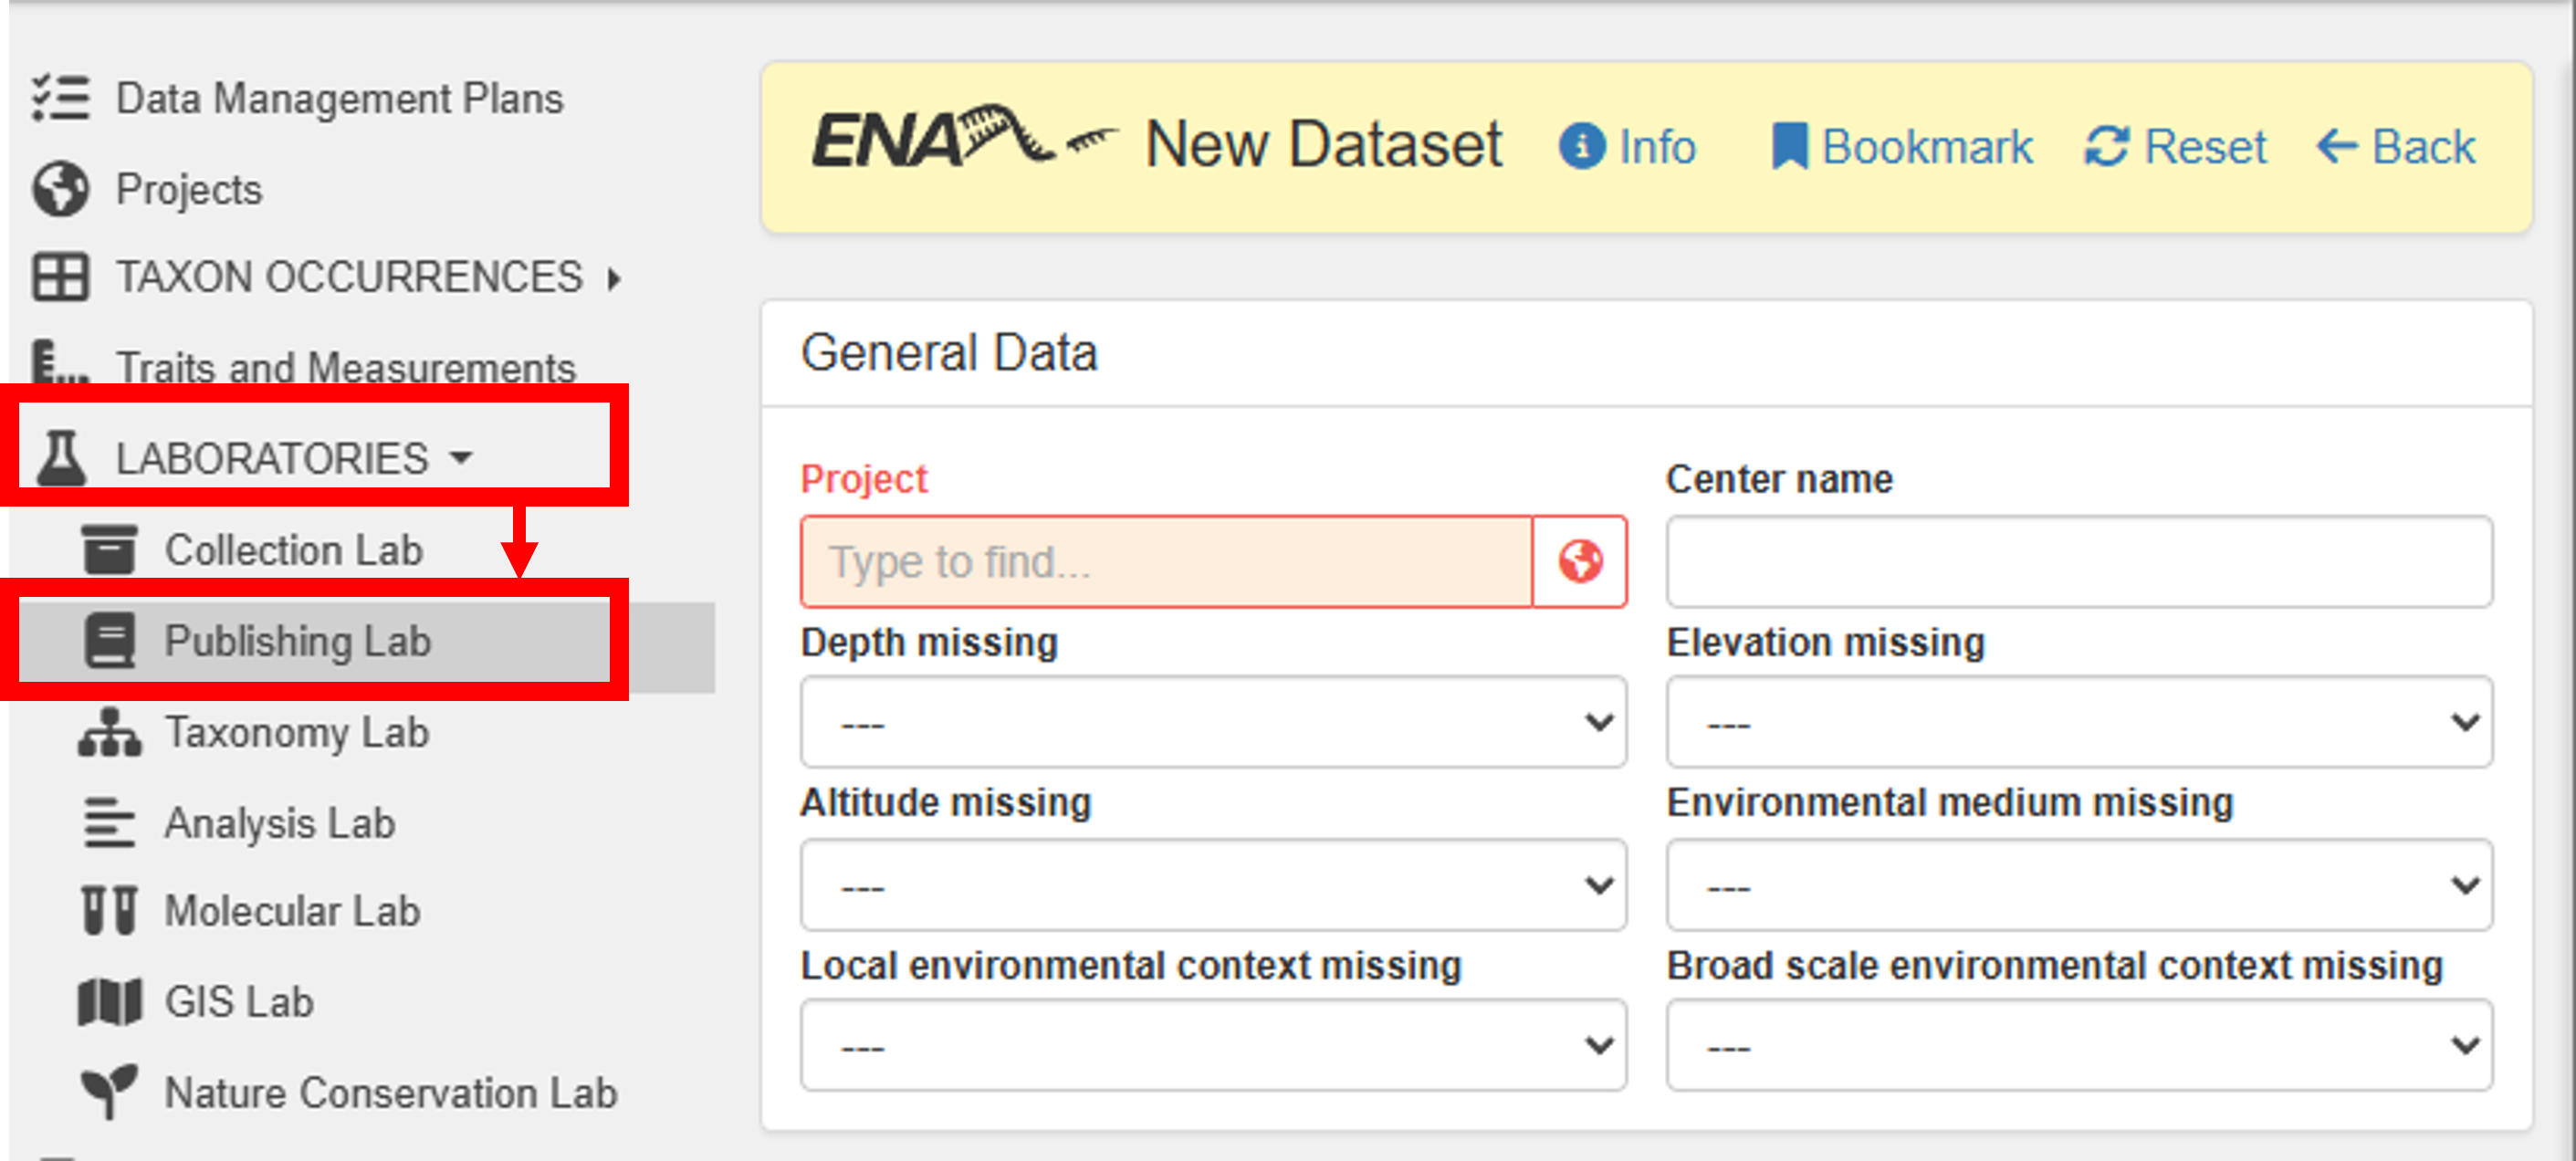
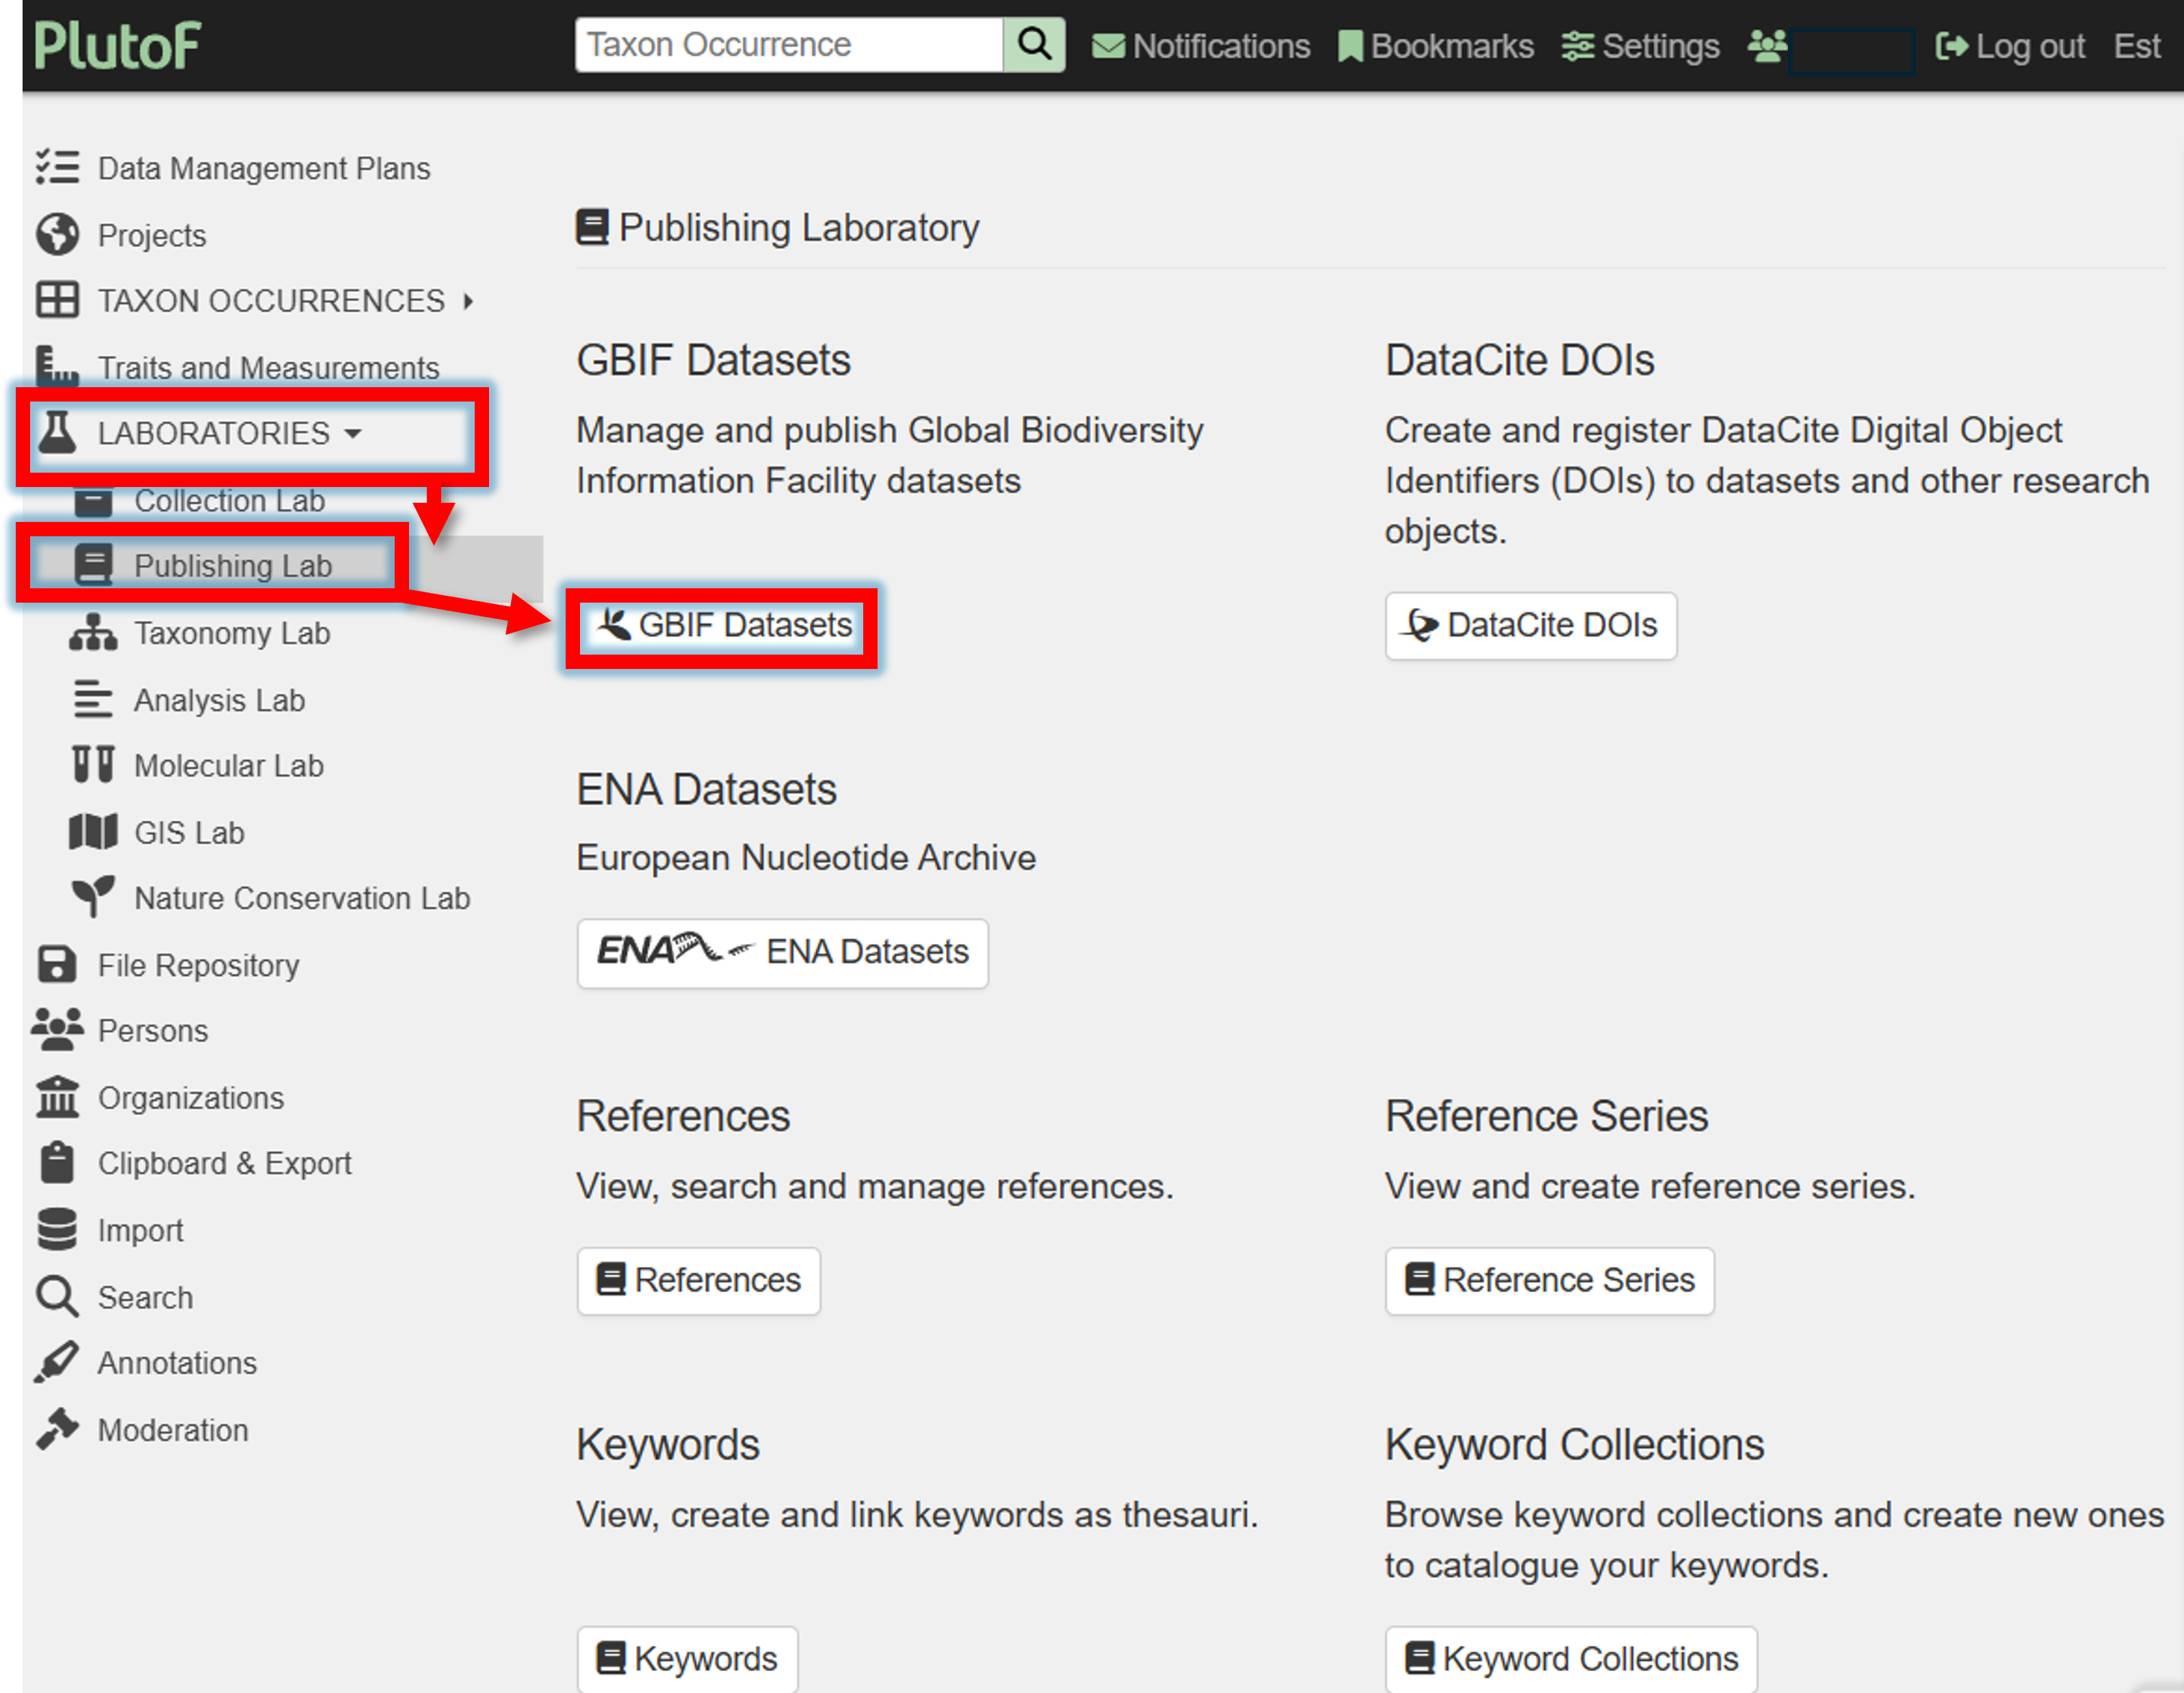
To publish your dataset in ENA, go to Main menu -> Laboratories -> Publishing Lab -> ENA Datasets -> New
Steps to publish:
Note
Samples uploaded to ENA are treated as independent samples (BioSamples) - that is, they are not linked to a BioProject. Samples will be linked to a BioProject when the raw sequence data is associated with the samples. See ‘Uploading raw sequence data to ENA’ below.
Uploading raw sequence data to ENA
When the samples are uploaded to ENA through the PlutoF platform, the raw sequence data can be linked to them. For that, first a BioProject needs to be created (Register a study), followed by the sequencing data submission.
Registering a study
To register a study, go to ENA website -> log in -> Register Study (Study is is also referred to as project/BioProject)

Study can be registered also programmatically, see here.
Specify the “Study Name”, “Short descriptive study title”, “Detailed study abstract” and “Release date” of the study.
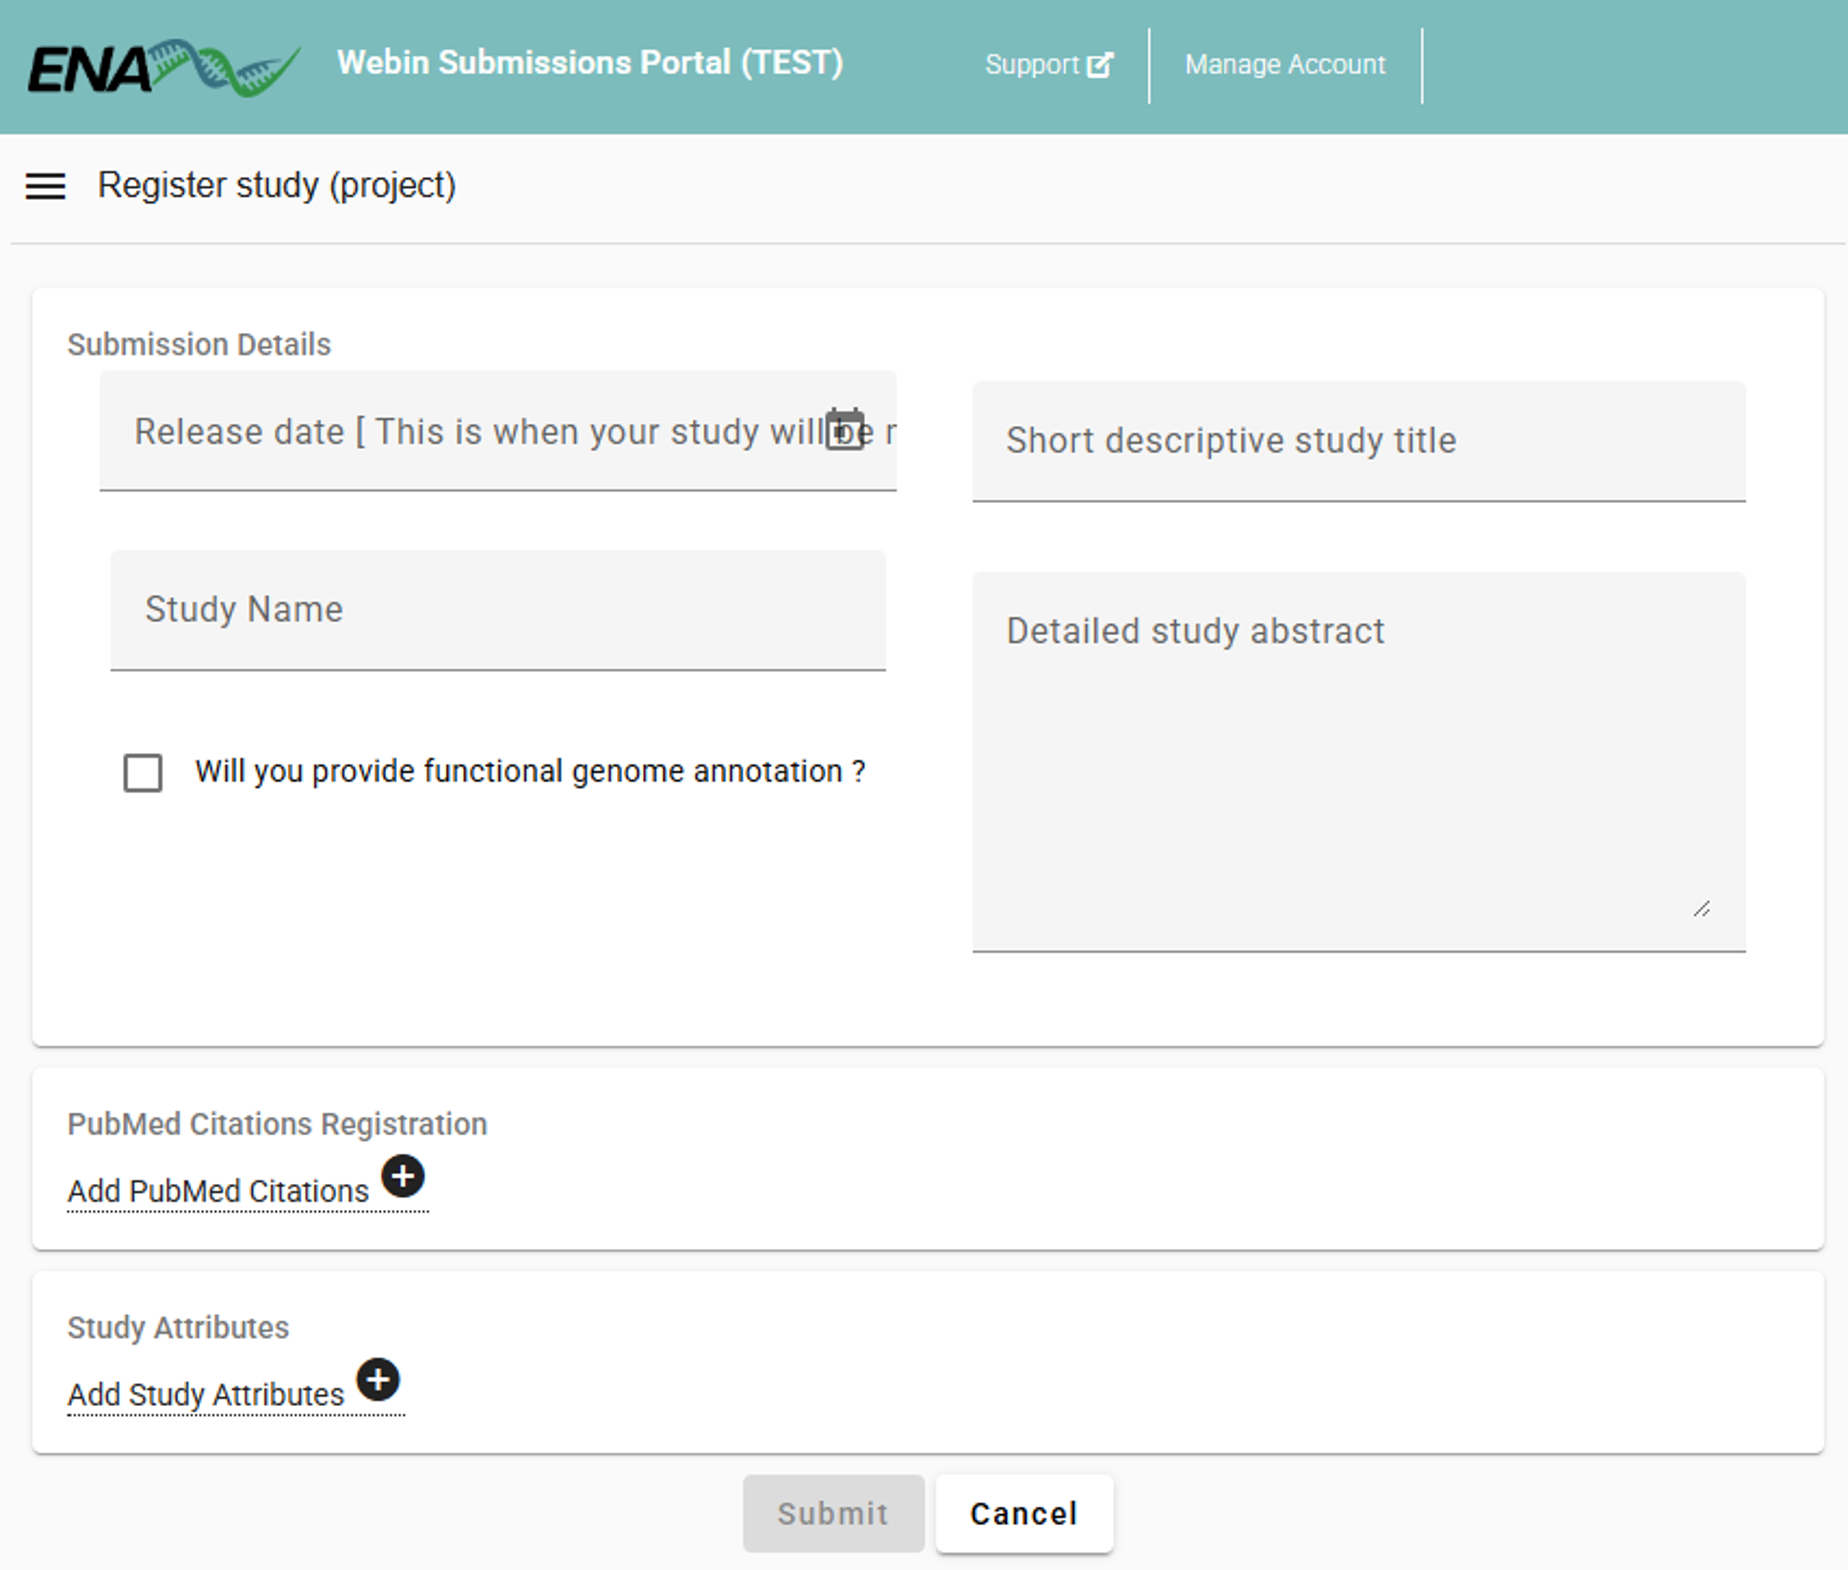
Example
Study Name: “BGE High Mountain Systems”
Short descriptive study title: “High Mountain Systems case study within Biodiversity Genomics Europe project: arthropod community monitoring along altitudinal gradients using Malaise Traps”
Detailed study abstract: “This study is part of the Biodiversity Genomics Europe (BGE) initiative. The project evaluates spatial and temporal variation in arthropod diversity along altitudinal gradients. Sampling was conducted in mountain ranges across seven European countries. Within each country, five elevation sites are selected along an altitudinal gradient. At each elevation, Townes-style Malaise traps were deployed and continuously sampled for 20 consecutive weeks in 2023. Samples were preserved in 96% ethanol. COI amplicons were generated with BF3 (CCHGAYATRGCHTTYCCHCG) and BR2 (CDGGRTGNCCRAARAAYCA) primers. Laboratory protocols are available at https://bioscanflow.readthedocs.io”
Release date: “2026-01-01”
Click here to open ENA user guide for registering a study.
Submitting sequencing data
After the study (BioProject) and samples (BioSamples) are registered, the sequencing data can be submitted.
Note
Samples were registered in ENA through the PlutoF platform. So, we have BioSample codes for the samples that are now associated with the sequencing data. See here how to export the sample IDs (Material Sample IDs) and the BioSample IDs from PlutoF.
Steps to submit sequencing data:
1. Upload the sequencing data to ENA via FTP
There are sever ways to submit the sequencing data to ENA (see ENA documentation). Here, we will use the FTP upload method.
Note
In Windows, Windows Subsystem for Linux (WSL) is recommended for uploading the sequencing data via FTP as built-in Windows FTP client may be problematic. See here for installation instructions. Once installed, you can use the following command to upload the sequencing data to ENA via FTP.
 # 1. Navigat to the DIRECTORY (folder) where the fastq files are located
 cd /path/to/fastq/files

 # 2. Upload the fastq files to ENA via FTP
 ftp webin.ebi.ac.uk # then enter your ENA username (Webin-#####) and password

 # 3. upload all fastq files in the current directory
   # Note that fastq files must be gzipped
 prompt          # upload without confirmation for each file
 mput *.fastq.gz # upload all fastq files in the current directory

 # 4. exit FTP client when uploads are complete
 bye
2. Download and fill in the spreadsheet template
Sequences should be submitted to ENA (step above) before the submission of the spreadsheet template.
To now link the uploaded sequencing data to the samples (BioSamples), go to ENA website -> log in -> Submit Reads
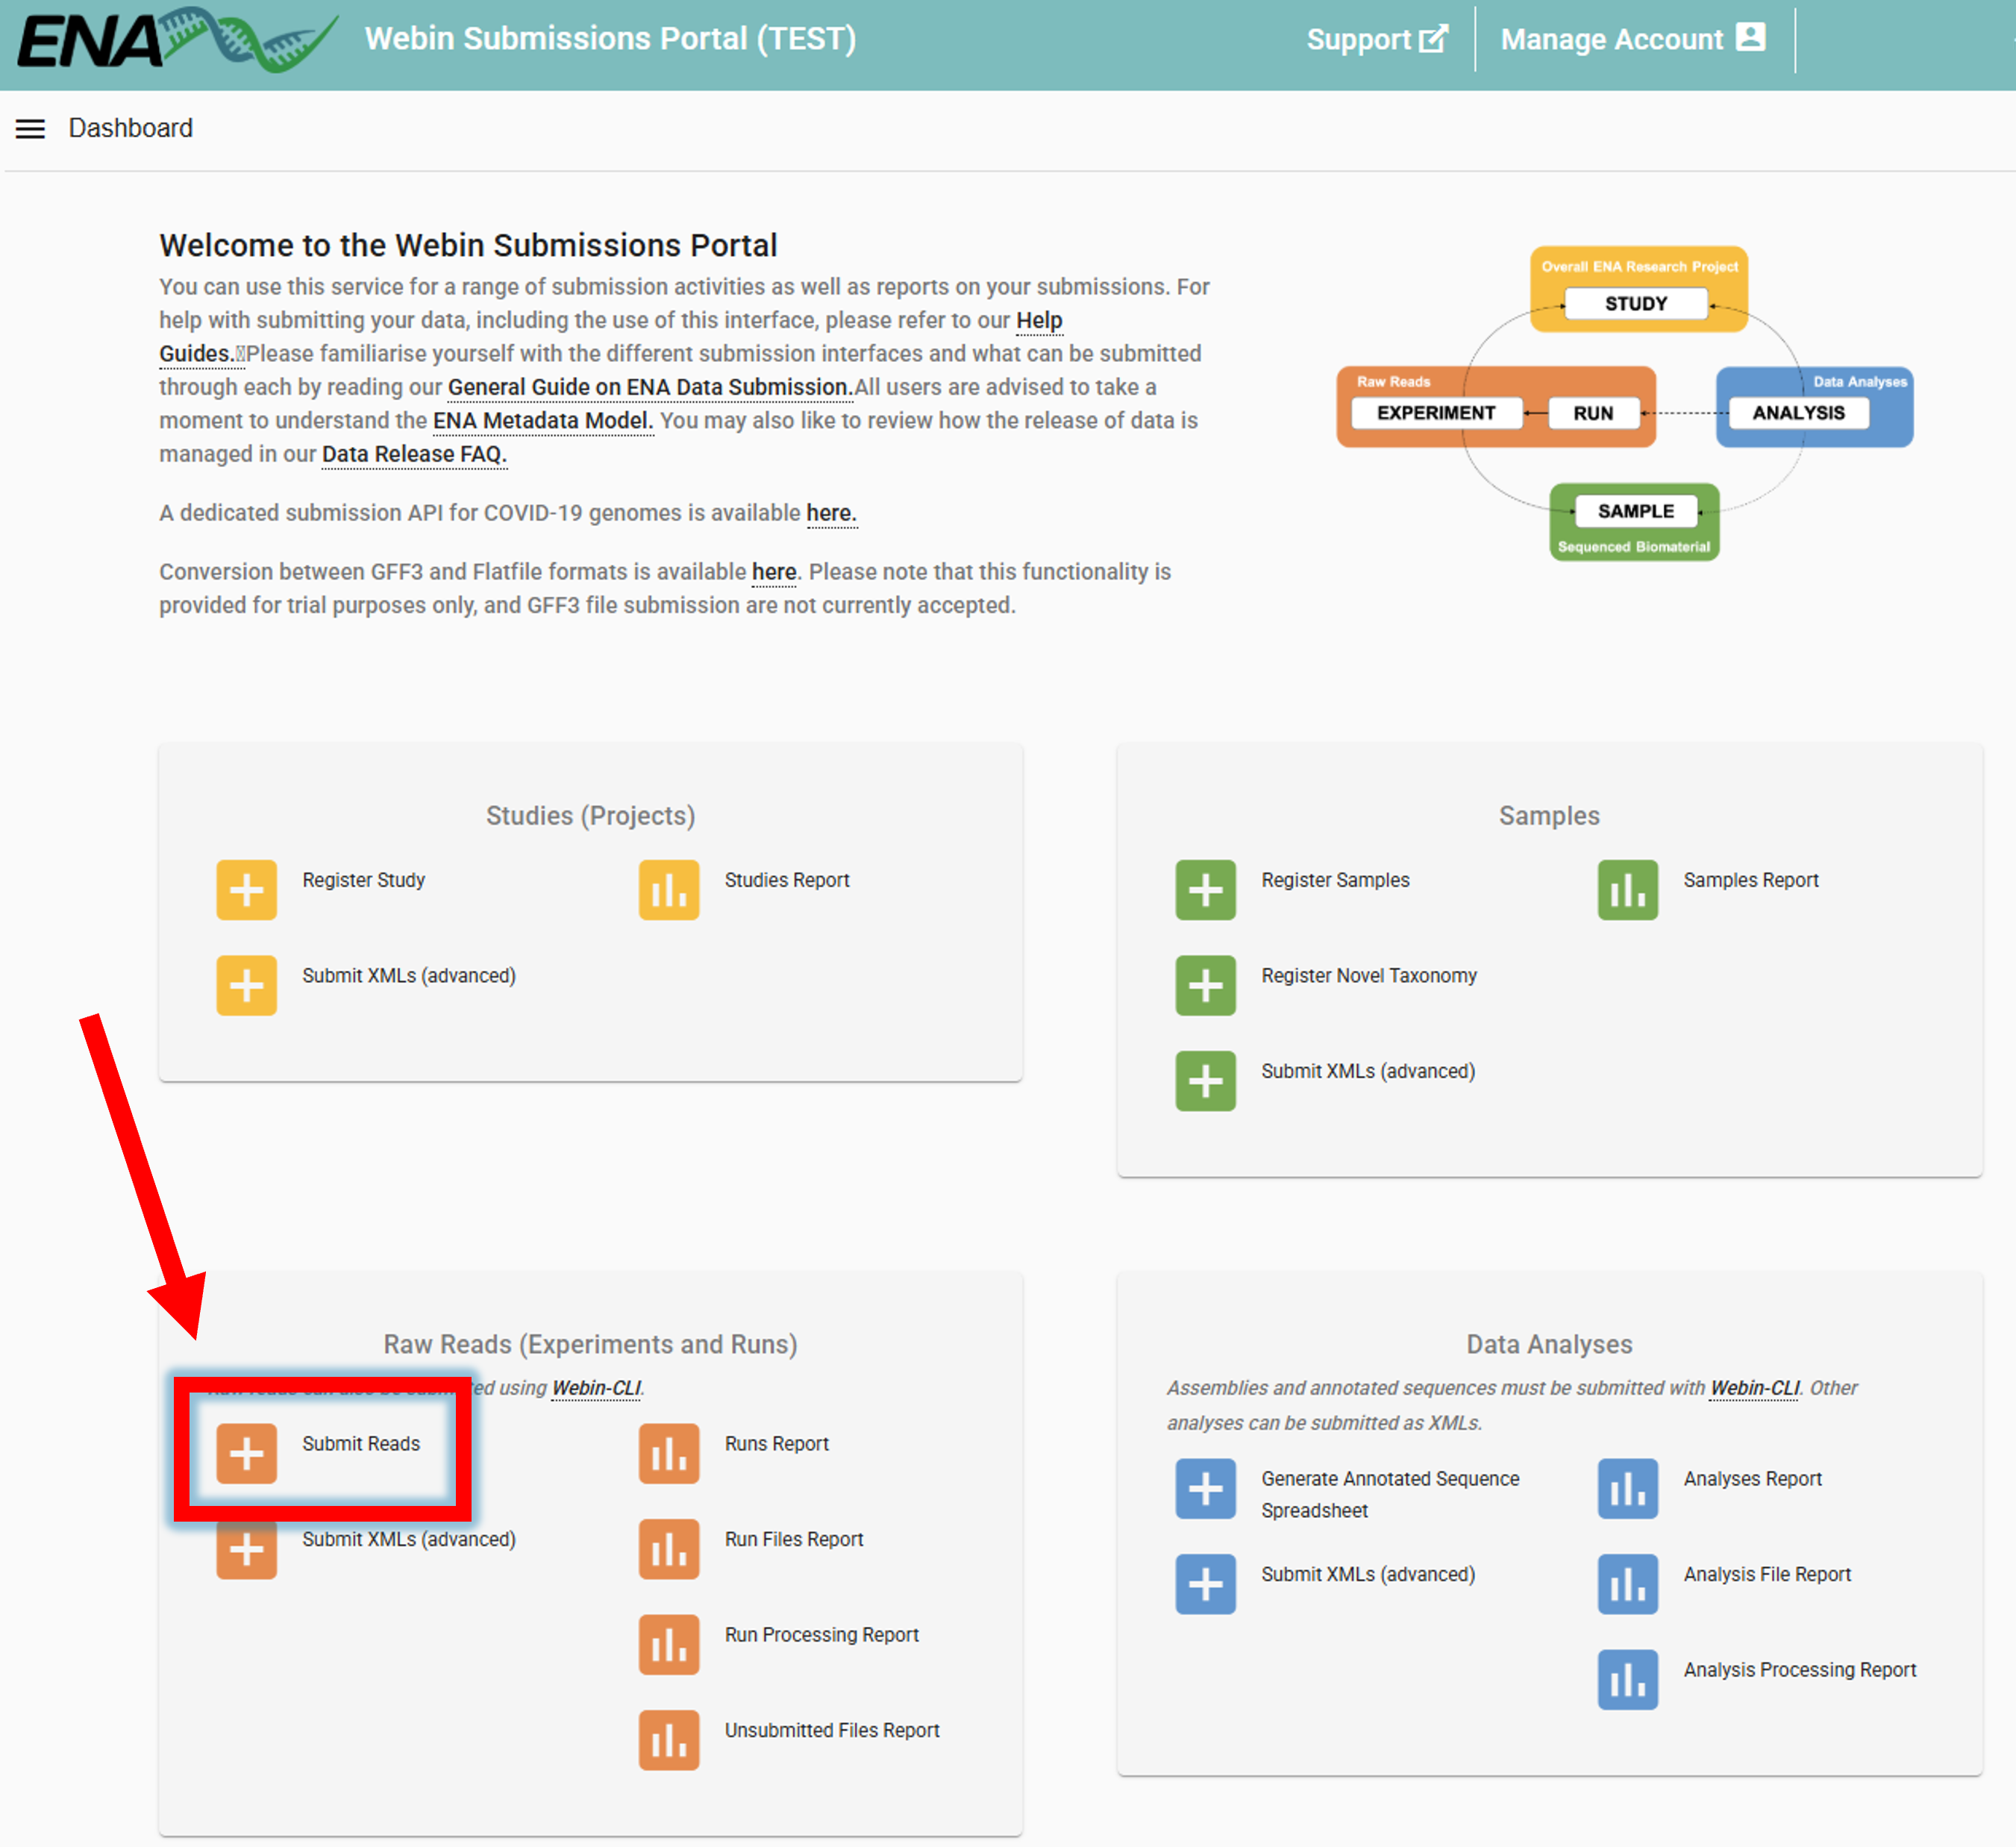
Clicking on Submit Reads will open the following window:
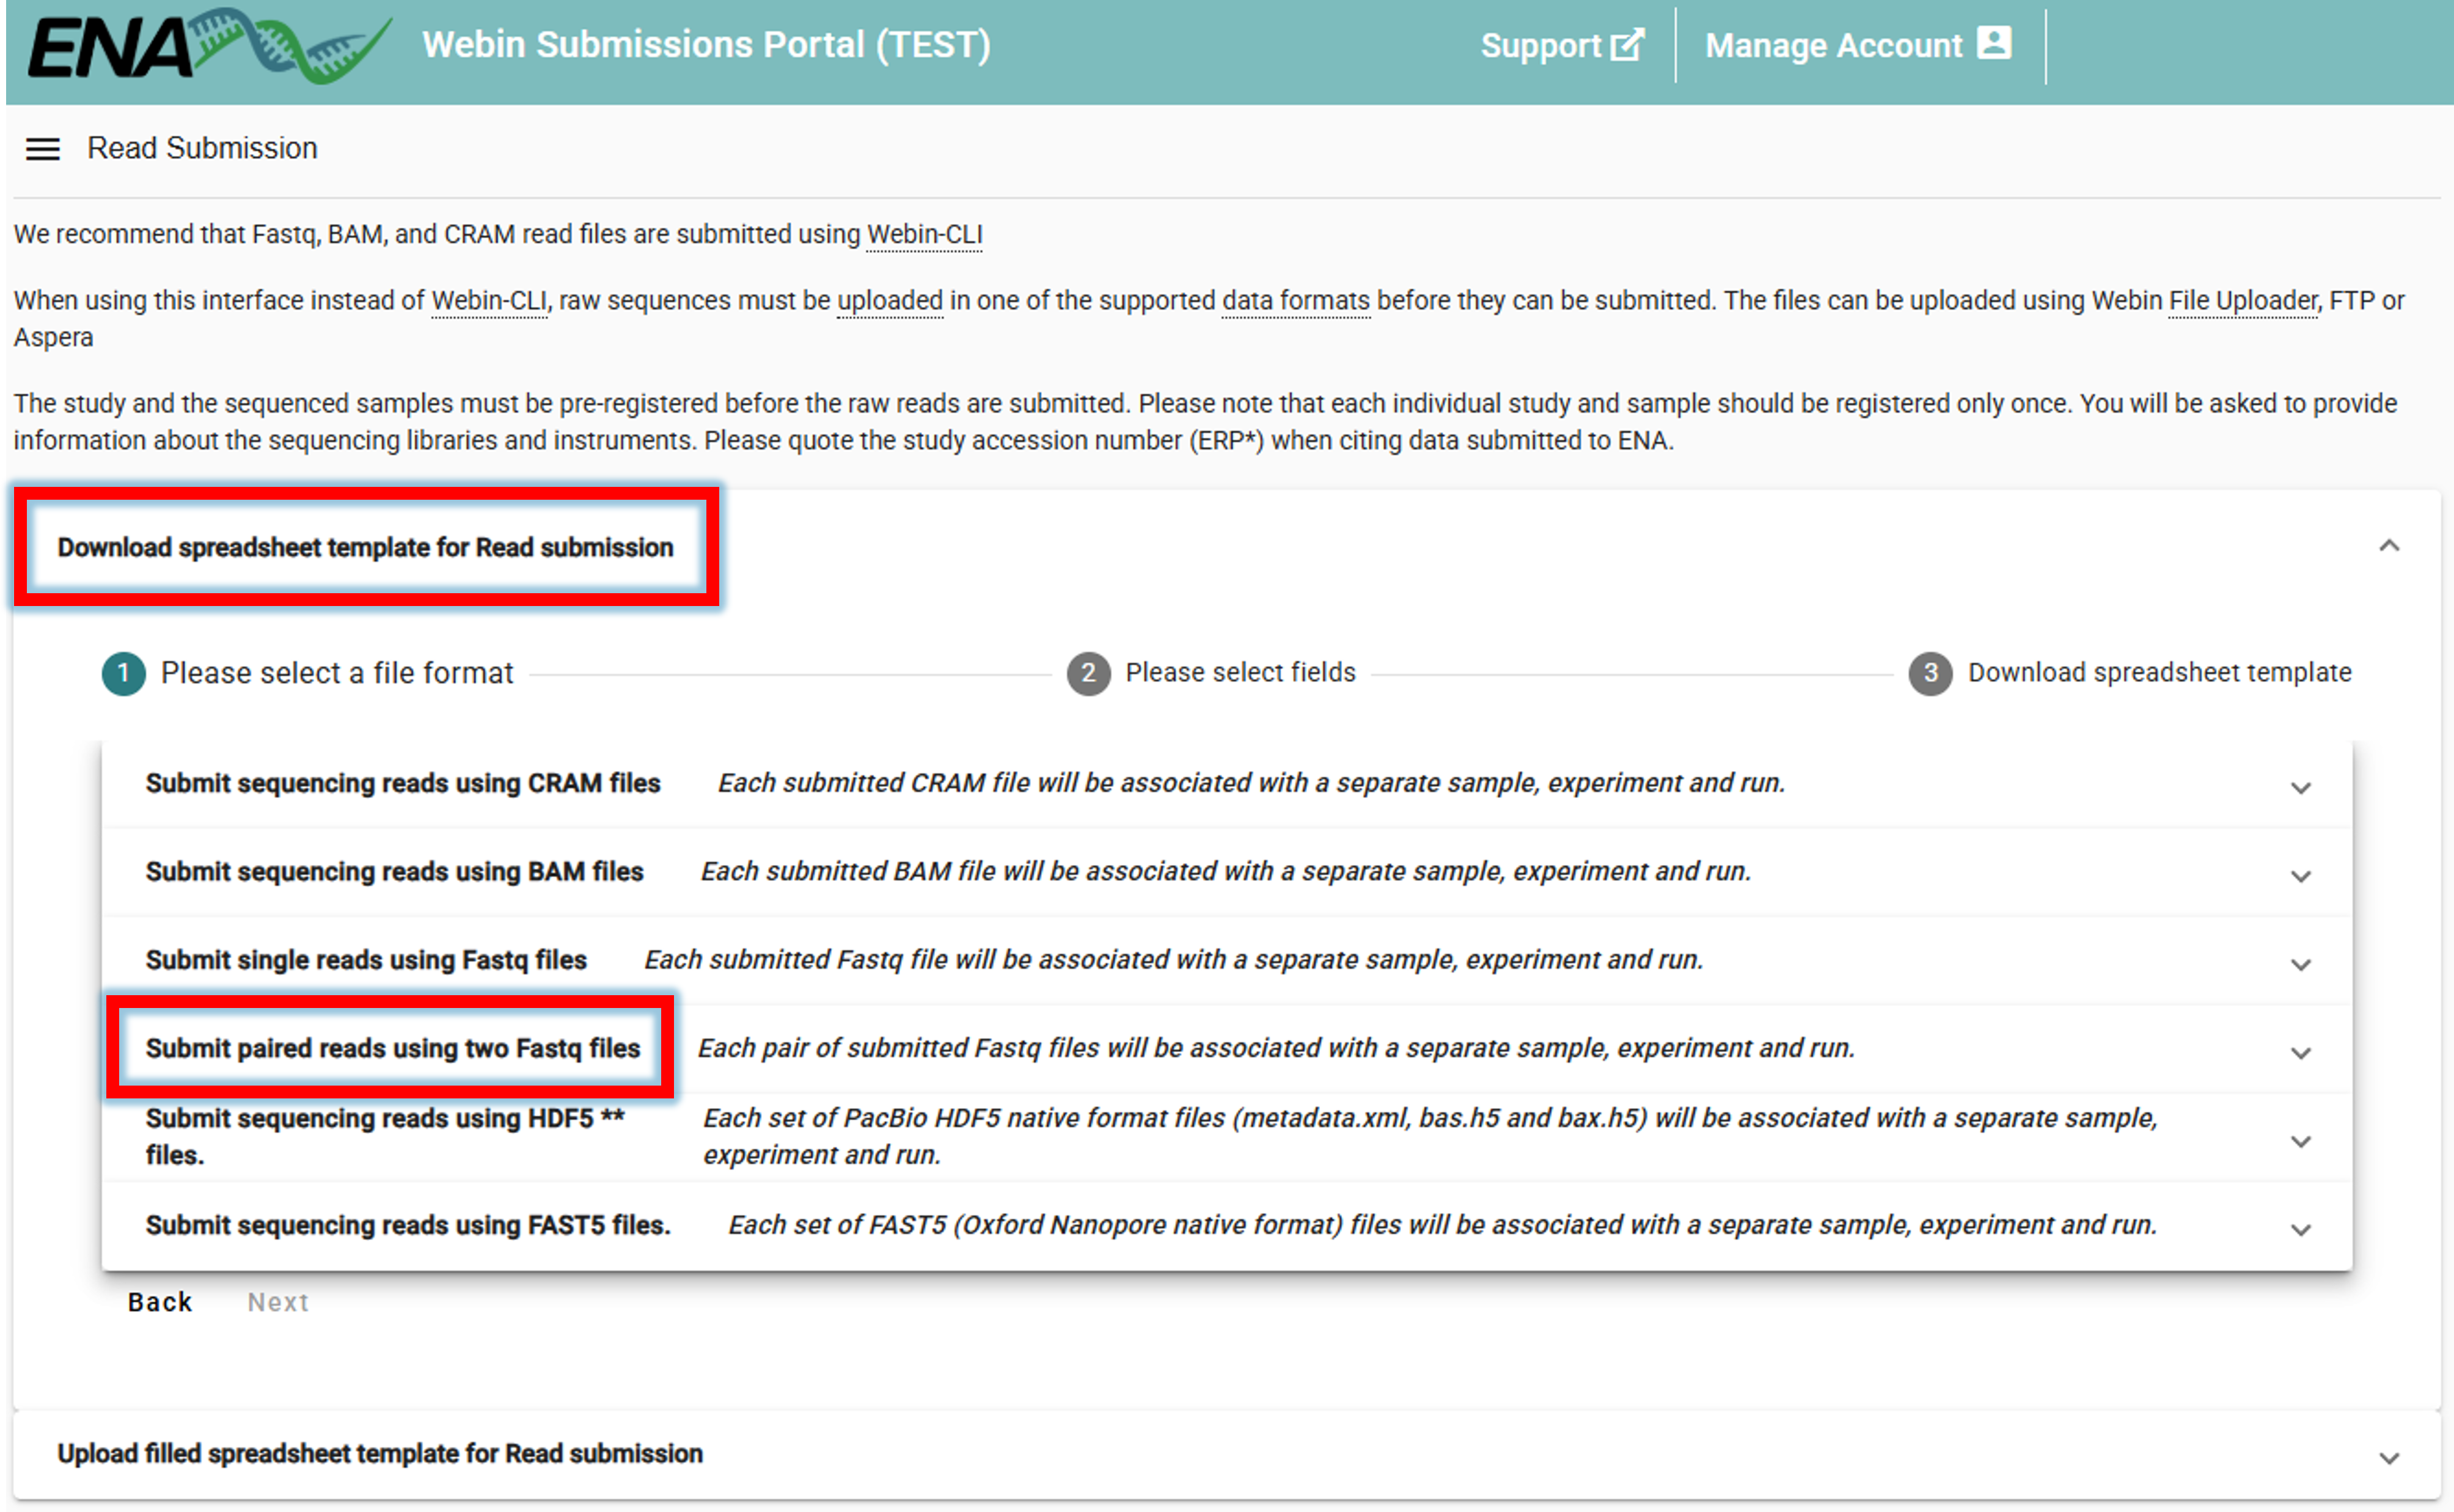
Download spreadsheet template for Read submission.
Here, we select Submit paired reads using two Fastq files since we have Illumina paired-end data
(select an appropriate option based on the type of data you are submitting).
Fill in the tsv (tab-separated) spreadsheet with the required data (use only valid ASCII characters). In the example below, the values for the sample represent the BioSample codes that have been obtained when samples were submitted to ENA via the PlutoF platform. The study column contains the BioProject code for the study we generated in the previous step.
Field |
Description |
|---|---|
sample |
BioSample codes |
study |
BioProject (study) code |
instrument_model |
sequencing instrument model (here: “Illumina NovaSeq 6000”) |
library_name
|
library name (herein those refer to the inhouse sample names,
e.g. “BGE.HMS0001”)
|
library_source |
library source (here: “METAGENOMIC”) |
library_selection |
library selection (here: “PCR”) |
library_strategy |
library strategy (here: “AMPLICON”) |
library_layout |
library layout (here: “PAIRED”) |
forward_file_name |
forward fastq file name |
forward_file_md5
|
32-digit hexadecimal numbers for upload verification for forward
fastq file. See below code how to calculate the MD5 checksum
|
reverse_file_name |
reverse fastq file name |
reverse_file_md5
|
32-digit hexadecimal numbers for upload verification for reverse
fastq file. See below code how to calculate the MD5 checksum
|
 # navigate to the directory where the fastq files are located
 cd /path/to/fastq/files

 # calculate the MD5 checksum for the forward fastq file
 for f in *.R1.fastq.gz; do md5sum $f | \
     awk '{ gsub("*", ""); print $2"\t" $1 }'; done > R1_md5sums.txt

 # calculate the MD5 checksum for the reverse fastq file
for f in *.R2.fastq.gz; do md5sum $f | \
     awk '{ gsub("*", ""); print $2"\t" $1 }'; done > R2_md5sums.txt

# open the MD5 checksum files and transfer the values to the spreadsheet template
Click on the image below to enlarge the example of a filled spreadsheet template.

Important
Always use the original spreadsheet template provided by ENA. Do not delete any rows or adjust the order of columns in the spreadsheet template. Doing so, may result in submission errors.
Multiple R1 and R2 fastq files per sample
It is common that the samples have multiple sequencing runs (i.e., one sample has more than just one R1 and R2 fastq file). In this case, the spreadsheet template should be filled as follows, where a sample that is associated with multiple sequencing runs is represented by multiple rows.
Click on the image below to enlarge the example of a filled spreadsheet template

3. Upload the filled spreadsheet template to ENA
Once the spreadsheet is filled, it can be uploaded to ENA.
Submit Reads –> Upload filled spreadsheet template for Read submission –> Submit Completed Spreadsheet

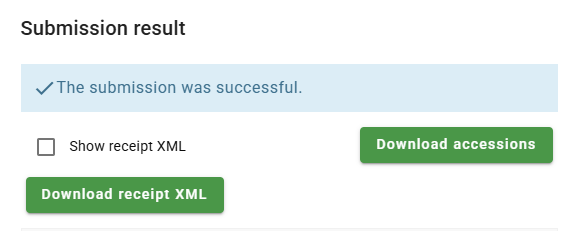
If everything is correct, the “The submission was successful” message will be displayed.
Even when the Study is public, it may take few days for the sequences to be available in ENA.
Click here to open ENA user guide for submitting sequencing data.
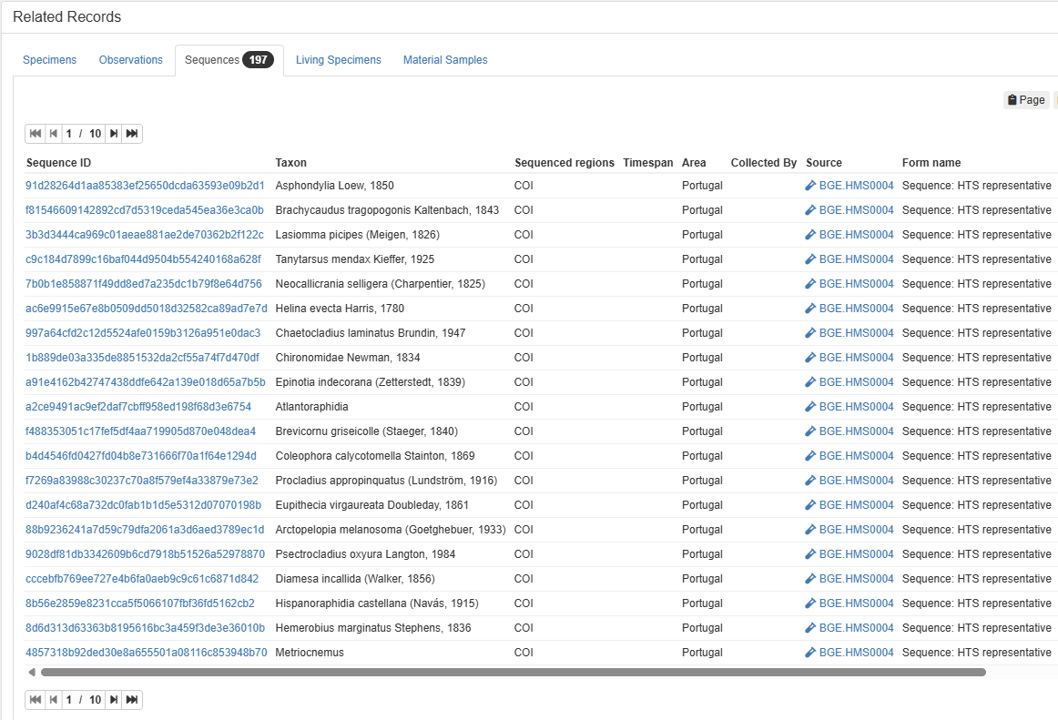
Uploading representative sequences of metabarcoding features to PlutoF
Representative sequences of metabarcoding features (OTUs/ASVs) and their taxonomy (and other information, such as read counts) per sample can be uploaded to PlutoF. Then each feature is tied to a specific sample (Material Sample ID) that connects the sequence data to where and when it was collected, which enhances data reuse and downstream data sharing.
Steps to upload representative sequences:
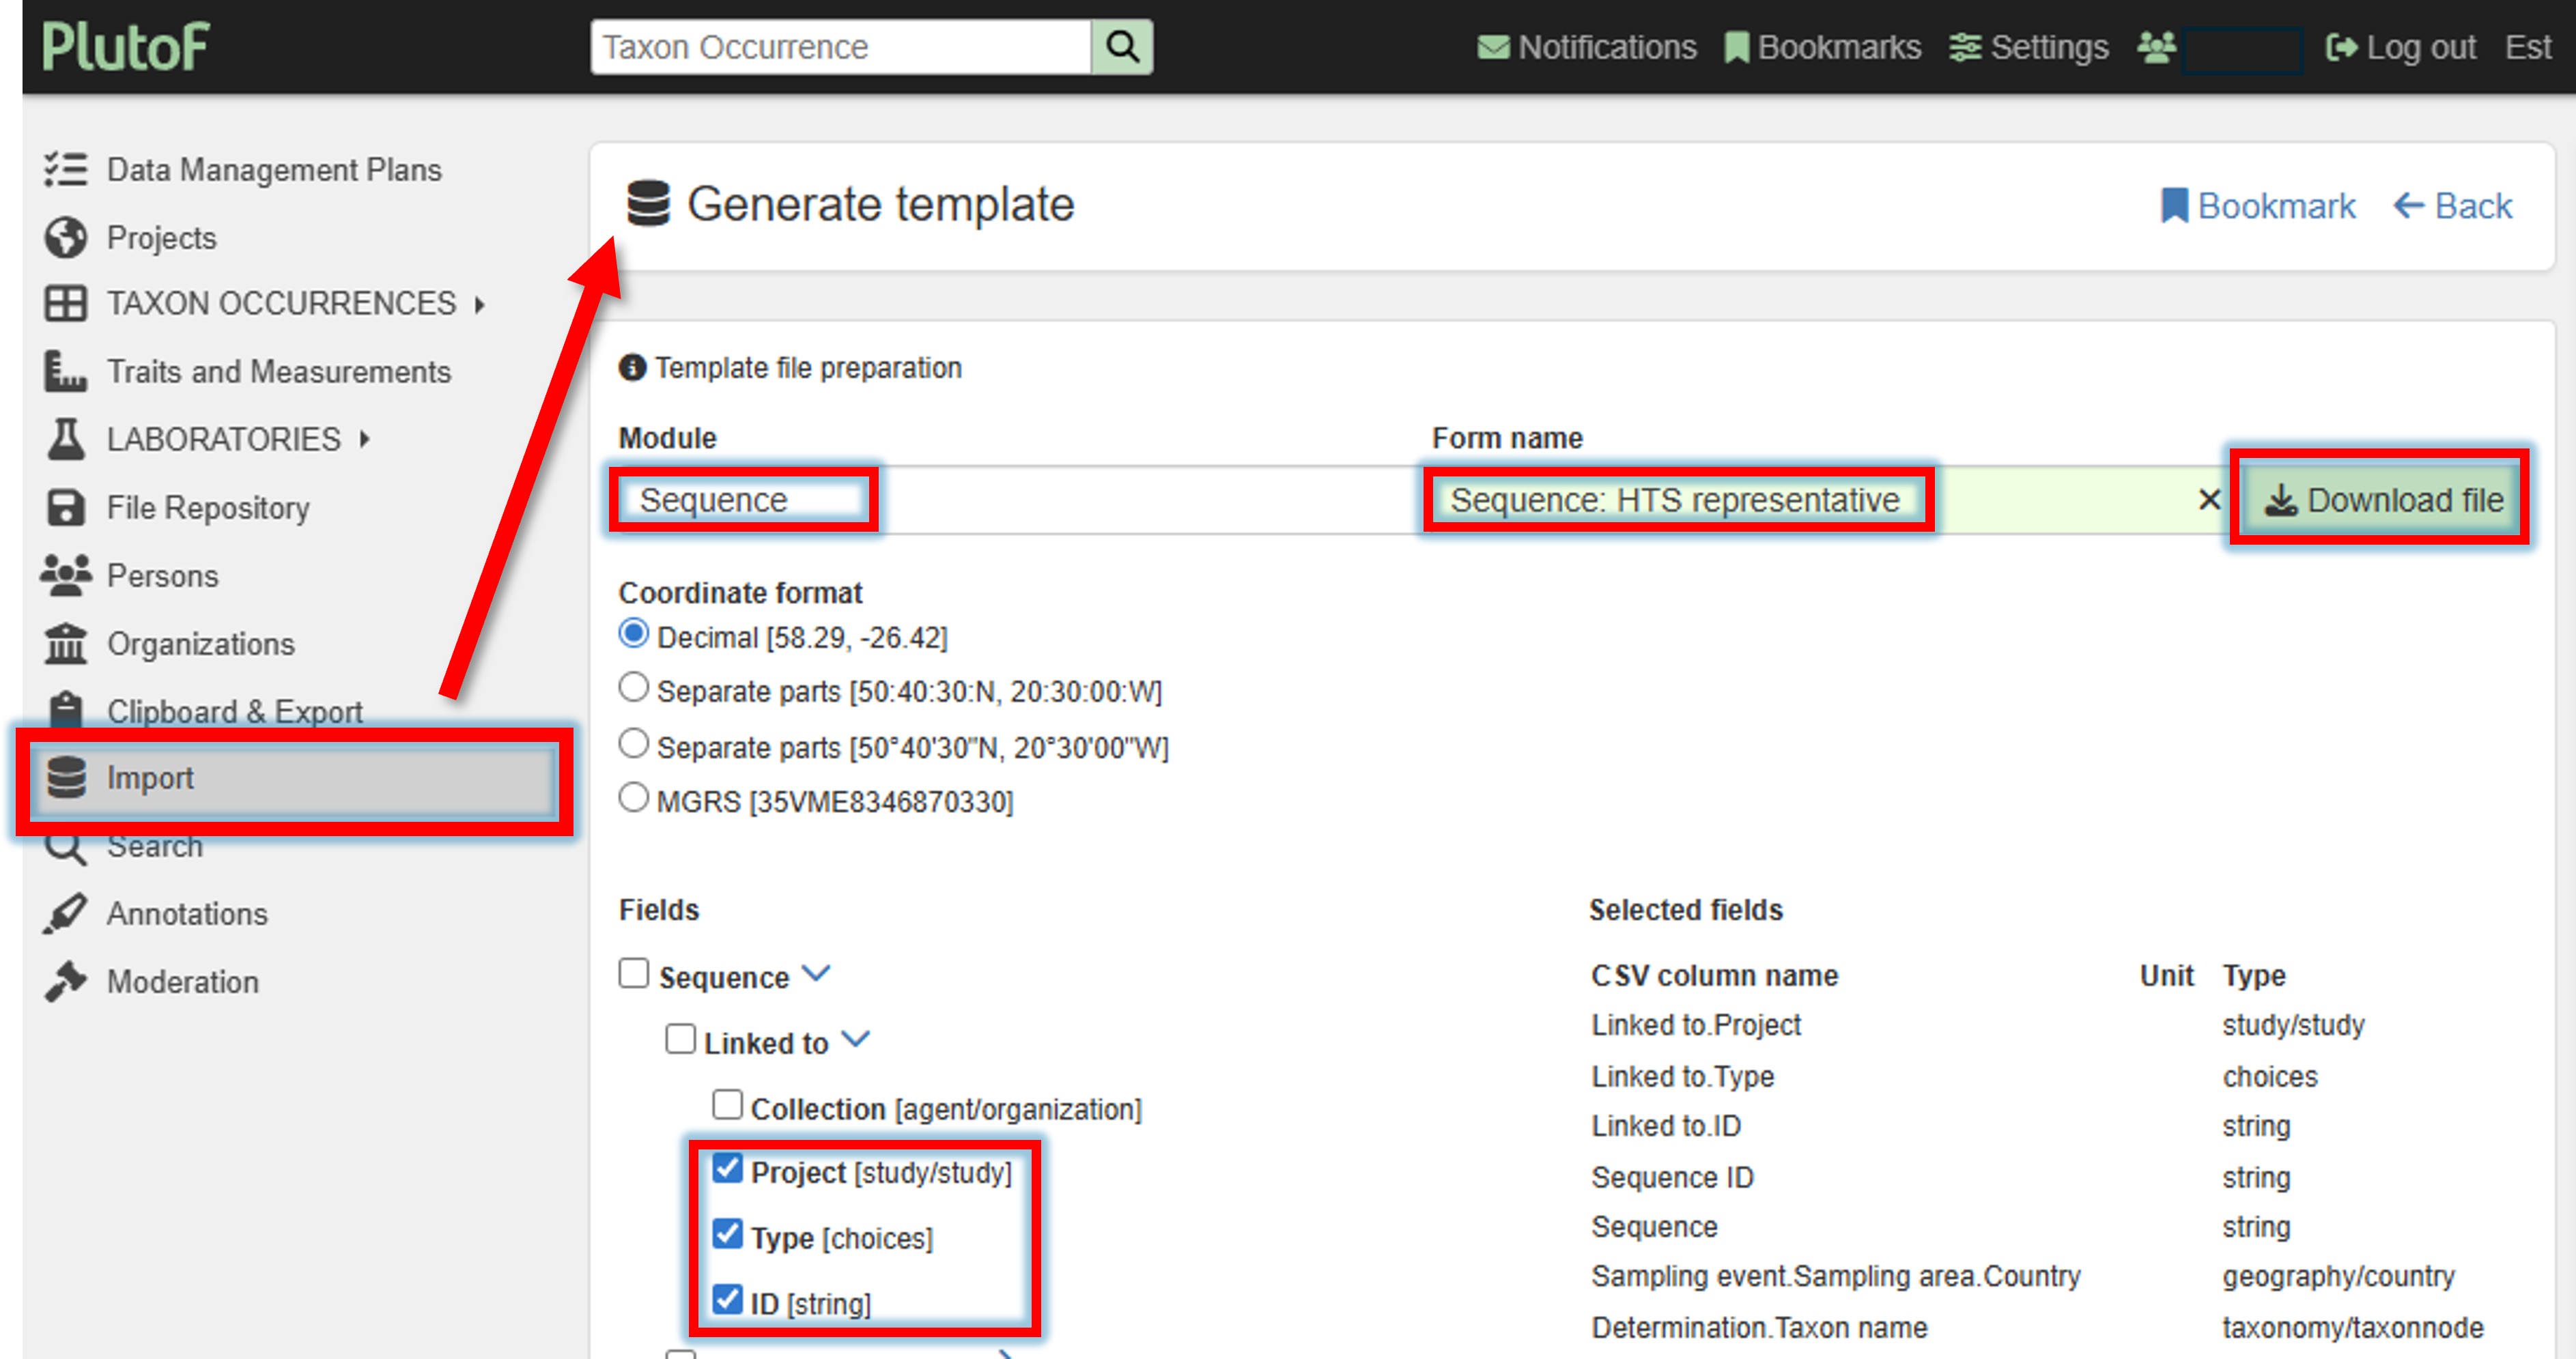
1. Download the template file for the import
A template file for the representative sequence import can be created and downloaded via Import panel –> Generate template by selecting the Module “Sequence” and Form name “Sequence: HTS representative”.
Select required filelds (minimum Project, Type, and ID)
2. Fill in the template file.
Fill in the template file with the representative sequences of ASVs/OTUs per sample.
Field |
Description |
|---|---|
Linked to.Project |
project name in PlutoF |
Linked to.Type |
here the type is materialsample |
Linked to.ID |
Material Sample ID |
Sequence ID |
Feature (ASV/OTU) Sequence ID |
Sequence |
Feature (ASV/OTU) Sequence |
Sampling event.Sampling area.Country |
Country where the sample was collected |
Determination.Taxon name |
Assigned taxonomy of the feature (ASV/OTU) |
Read count.Value |
Read count of the feature (ASV/OTU) |
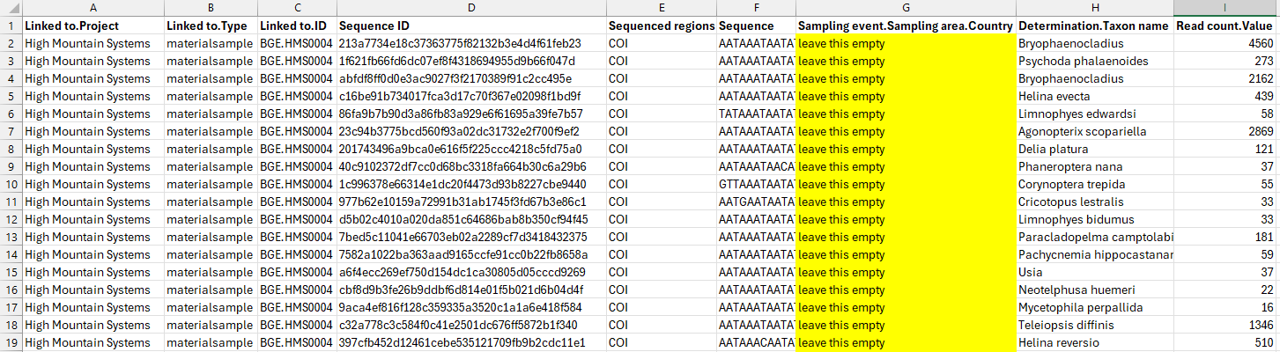
Click on the image below to enlarge the example of a filled sequence template (for one sample).
Note
Leave the column Sampling event.Sampling area.Country empty to
automatically associate the sequence with the sample coordinates in PlutoF.
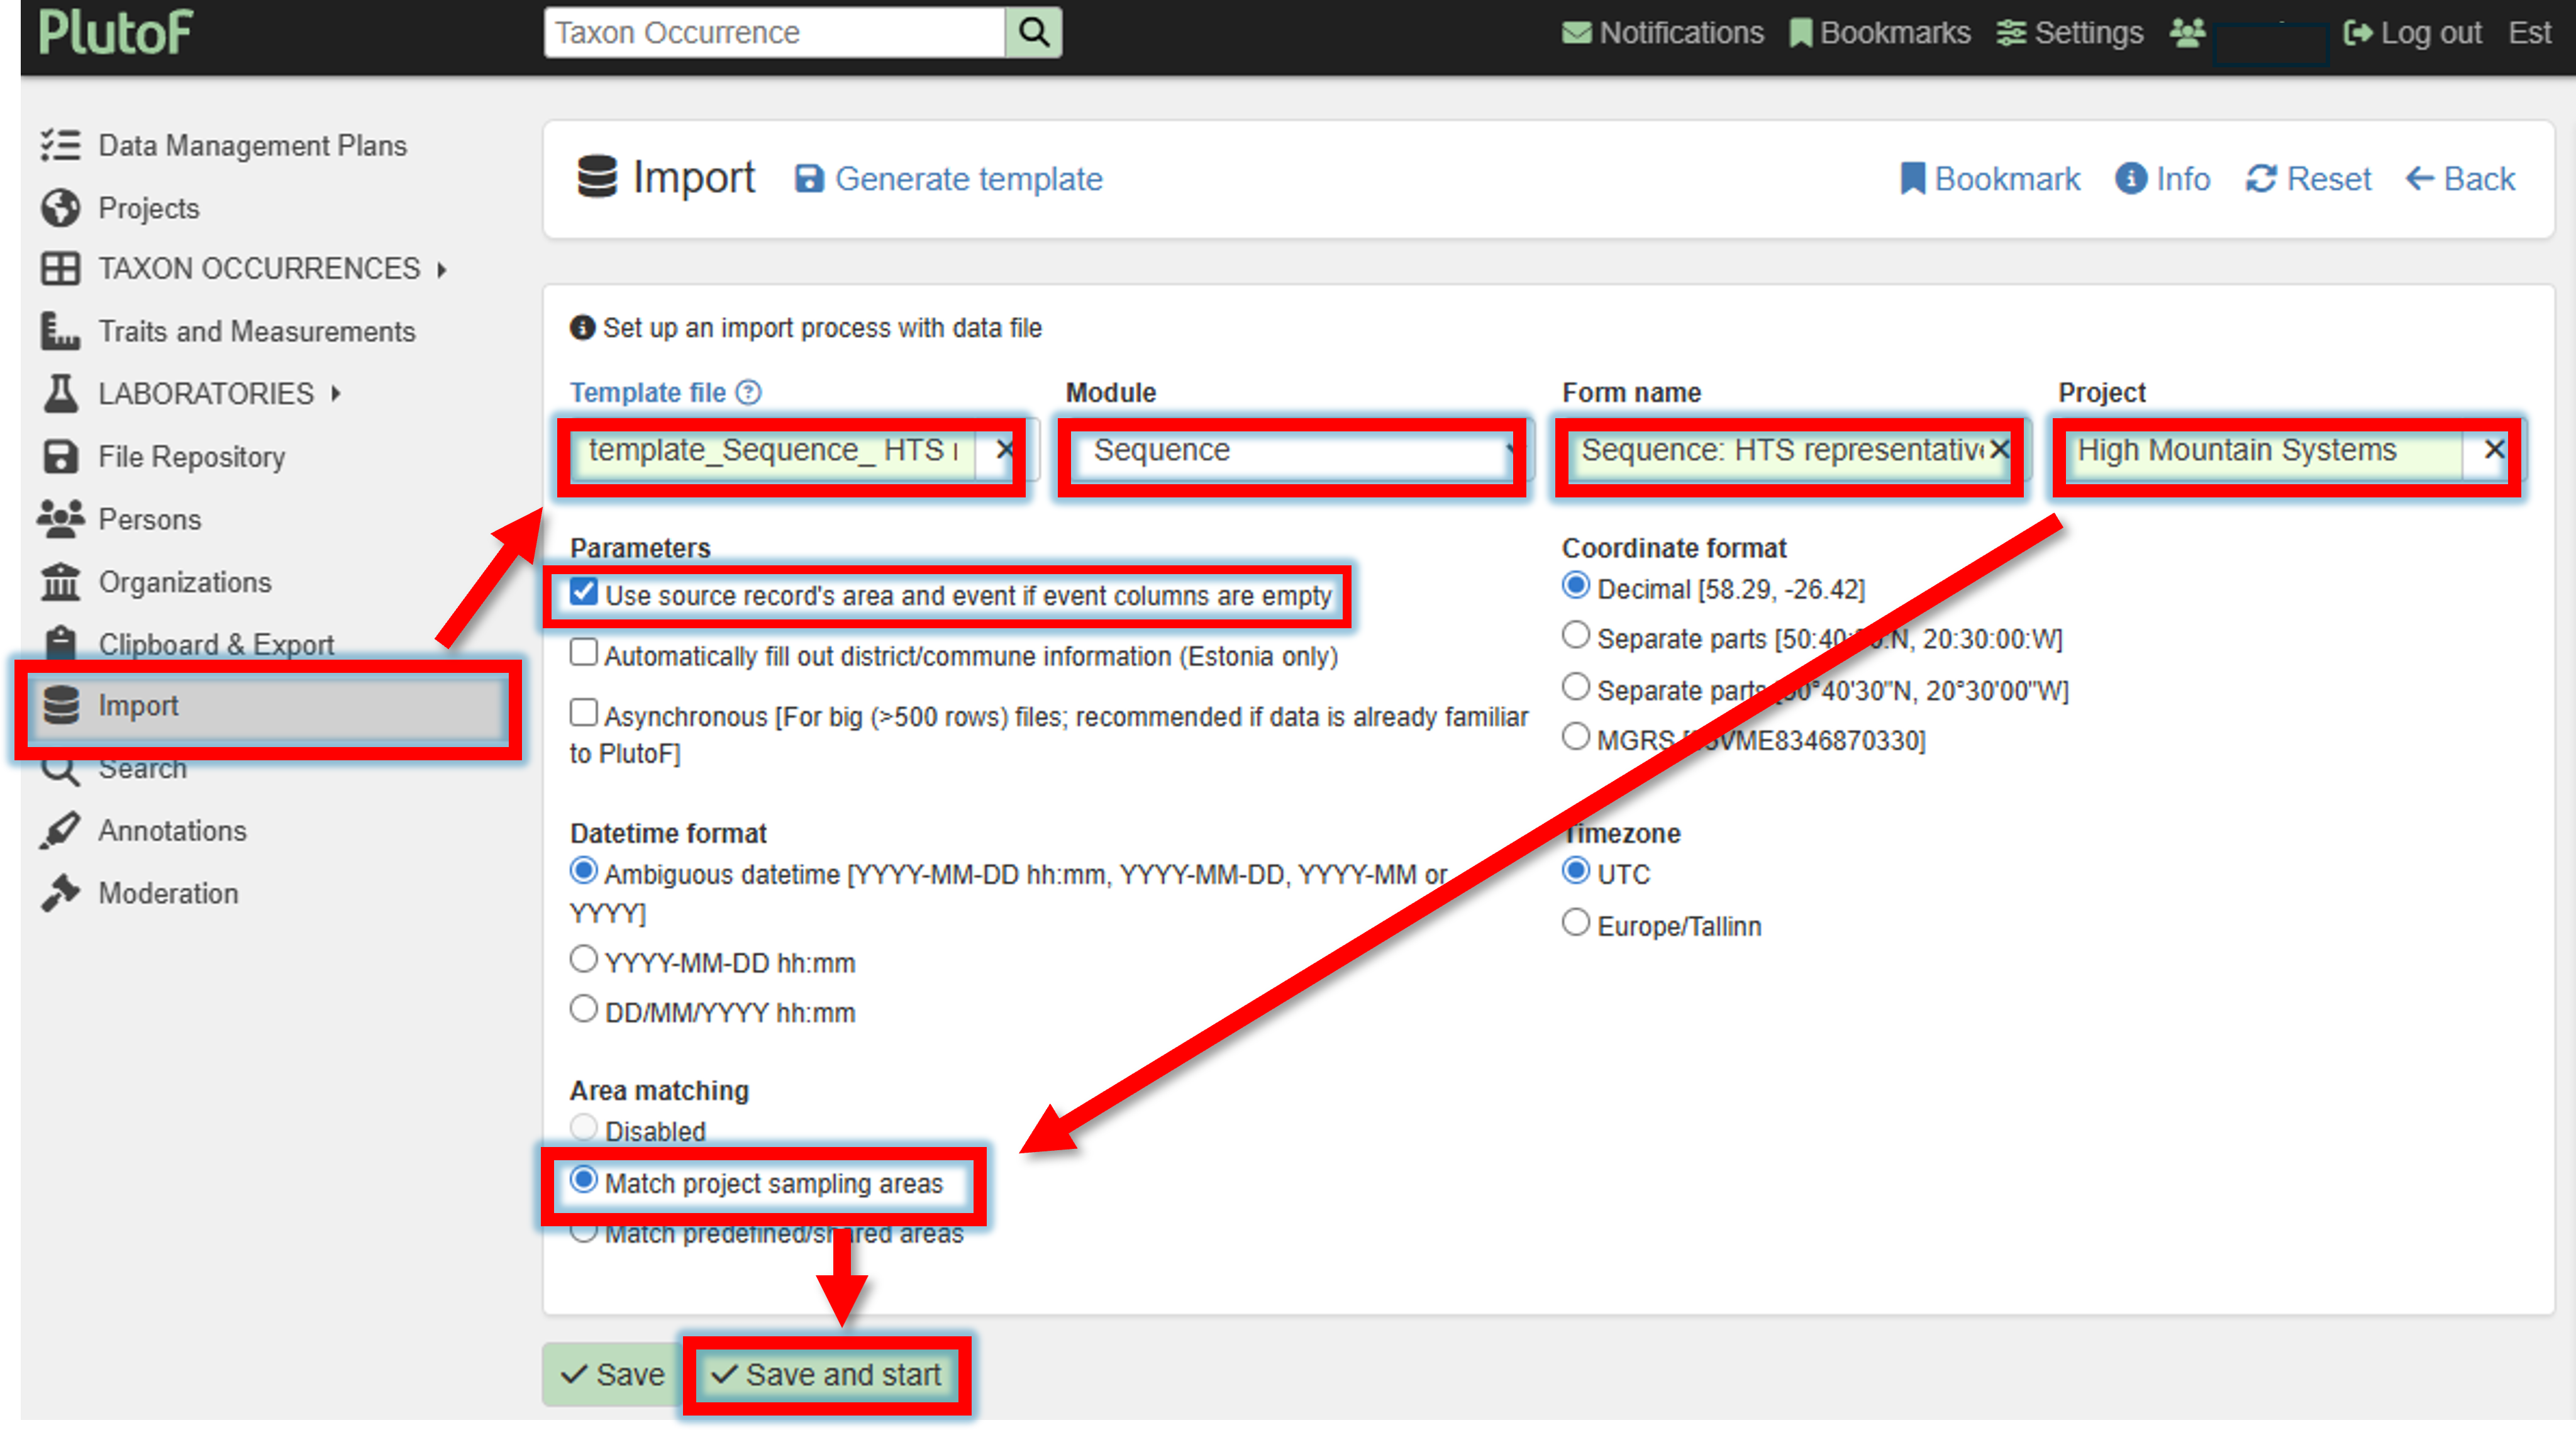
3. Upload the template file
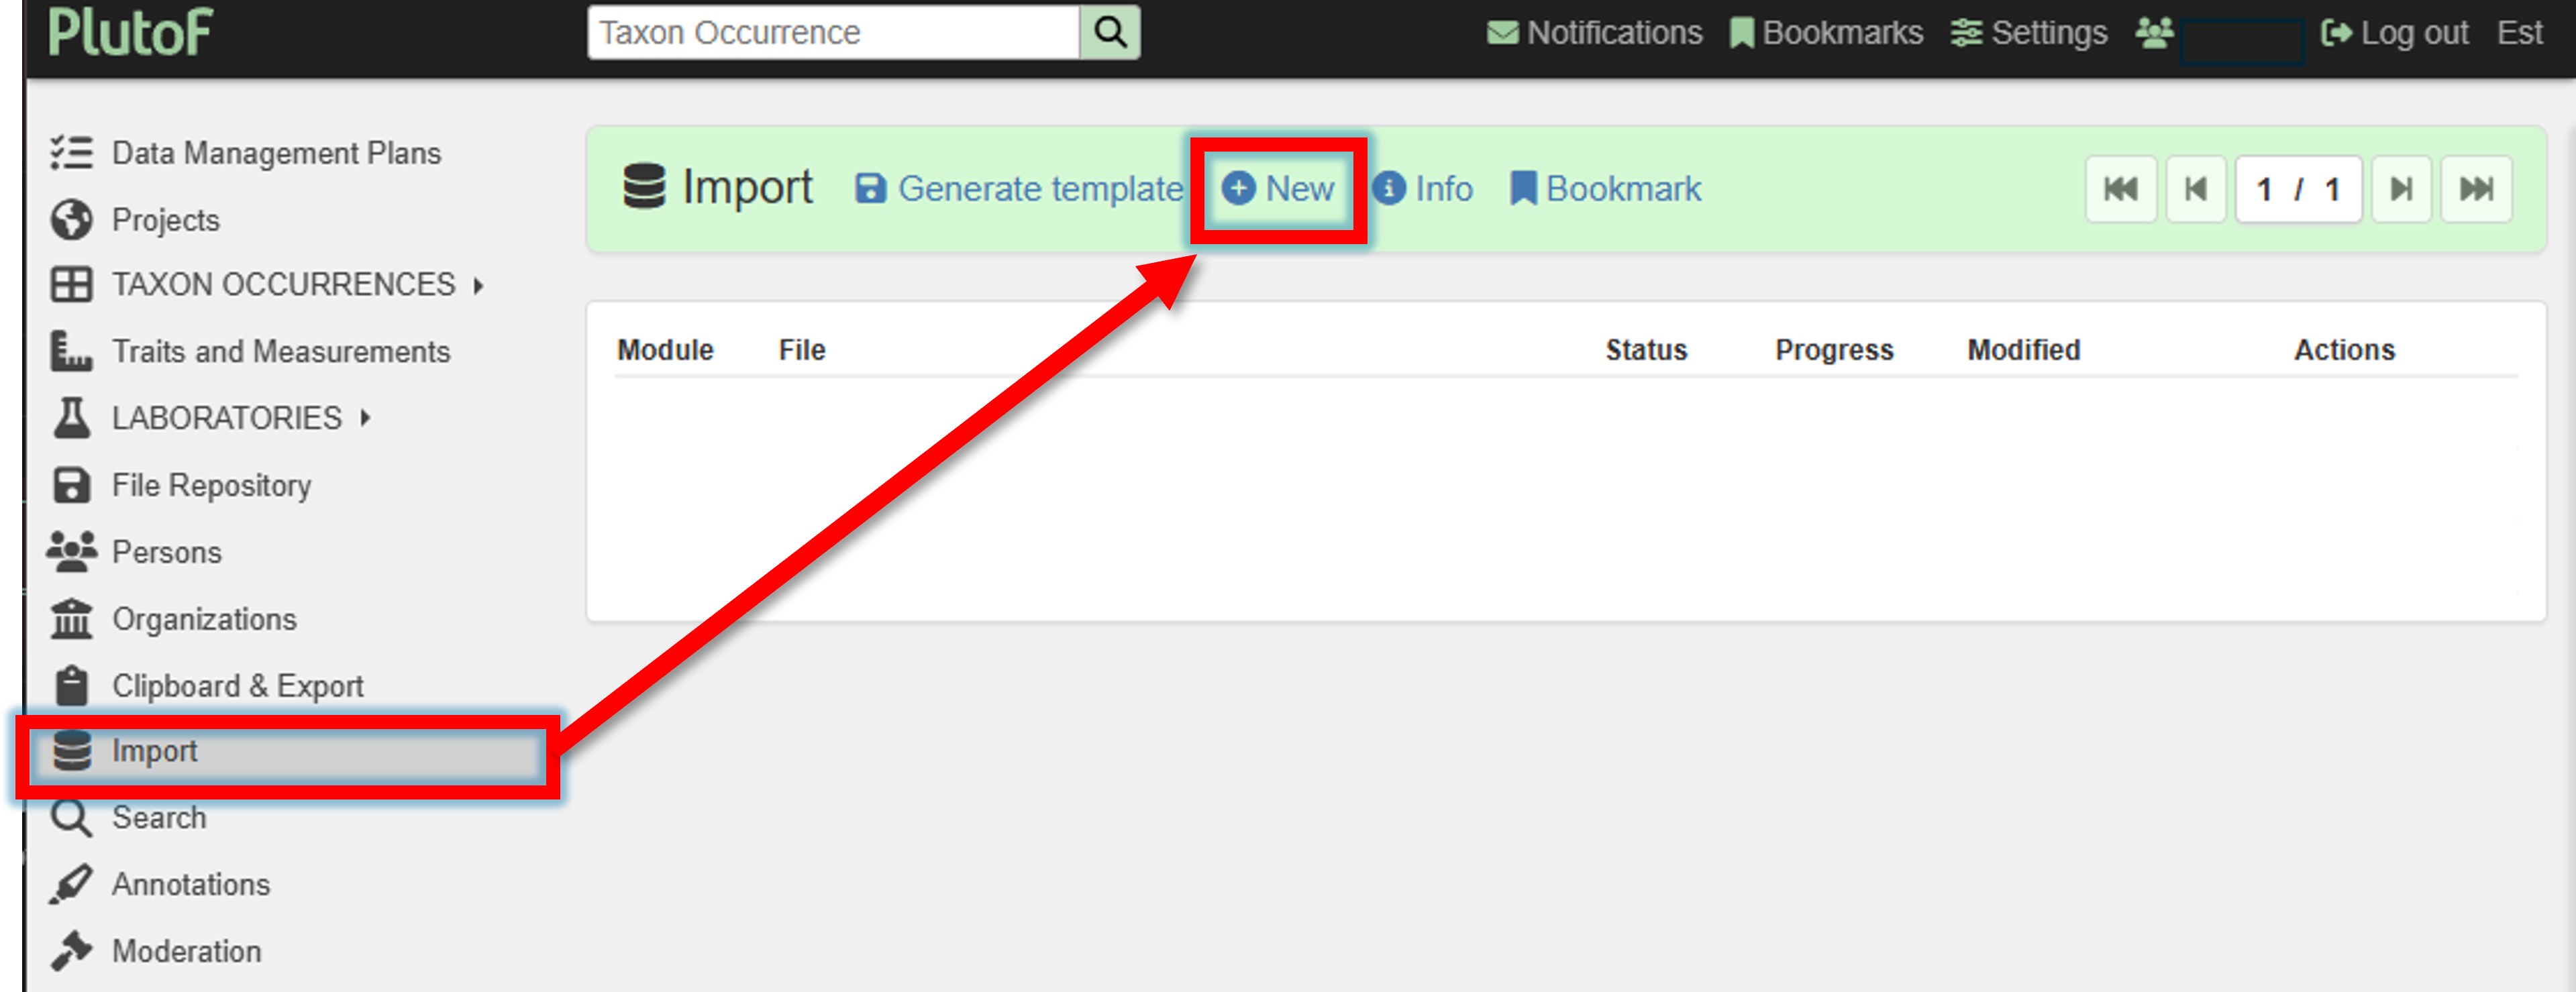
Once the template file is filled, it can be uploaded to PlutoF via the Import panel.
Import panel –> New (new import process)
Upload the filled template file,
specify Module
SequenceForm name
Sequence: HTS representativeProject
Your project nameCheck the box for “Use source record’s area and event if event columns are empty”
Match project sampling areas
–> Save and start
Note

When this ERROR message is displayed, save your CSV file as CSV UTF-8. In Excel, select File –> Save As –> CSV (UTF-8). Try the file upload again.
After clicking the Save and start button, the interactive import process will begin and guide the user through the procedure.
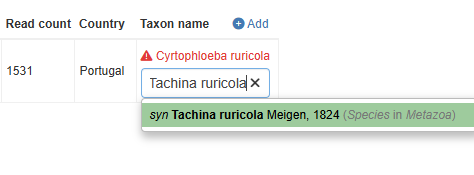
You will be notified if any errors occur during the import process.
The likely case is you need to fix the synonyms. This can be done interactively (see below image). When edited, then press Save and continue to proceed with the import process.
When the import is complete, you may press the Back button.
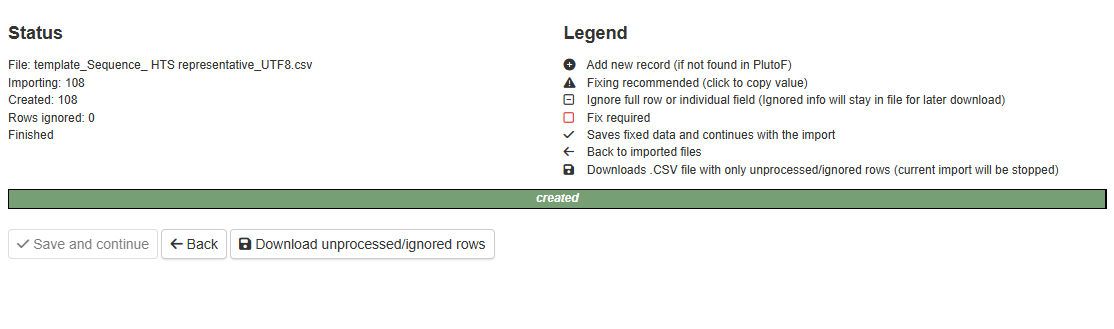
DONE
The sequences are accosiated with the sample(s).
Publishing metabarcoding features in GBIF
Submitting metabarcoding biodiversity data to GBIF makes it publicly discoverable and reusable (the data becomes citable with a DOI). GBIF does not store sequence reads (those belong in repositories like ENA for raw data, and ASV/OTU representative sequences to PlutoF). Instead, GBIF hosts taxonomy assignments (taxonomic name for an ASV/OTU) and sampling event metadata (location, time, etc).
Herein, the prerequisite for publishing metabarcoding features (ASVs/OTUs) in GBIF is to have the representative sequences uploaded to PlutoF (see section Uploading representative sequences of metabarcoding features to PlutoF).
Steps to publish in metabarcoding biodiversity data in GBIF through PlutoF:
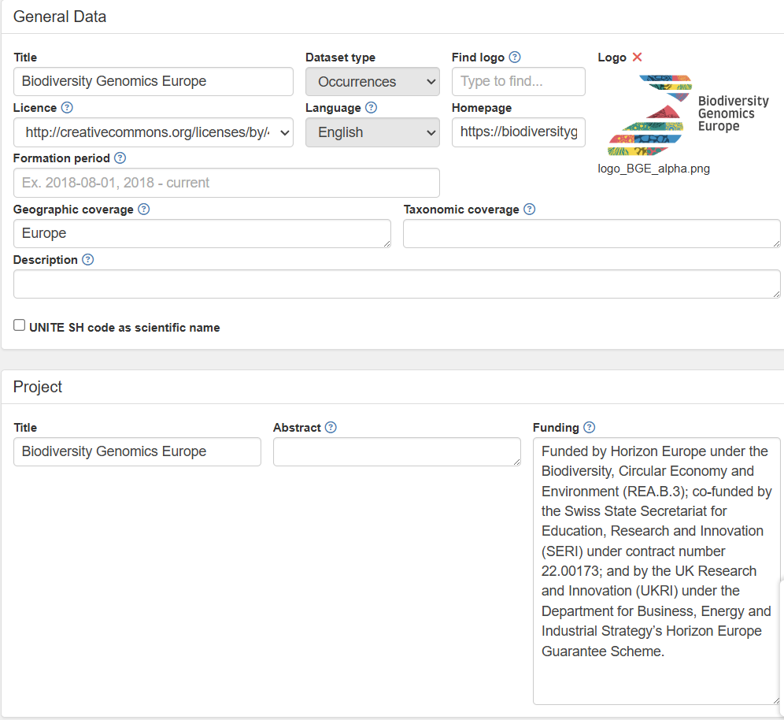
1. Create a new GBIF dataset in PlutoF.
Choosing the license
When creating a new GBIF dataset, you need to choose a license. The license can be chosen from the following options:
CC0 - choose when you want to share the data without any restrictions.
CC-BY - choose when you want to share the data with attribution to the original authors.
CC-BY-NC - choose when you want to share the data with attribution to the original authors, but not for commercial use.
2. Fill the and save the new GBIF dataset form.
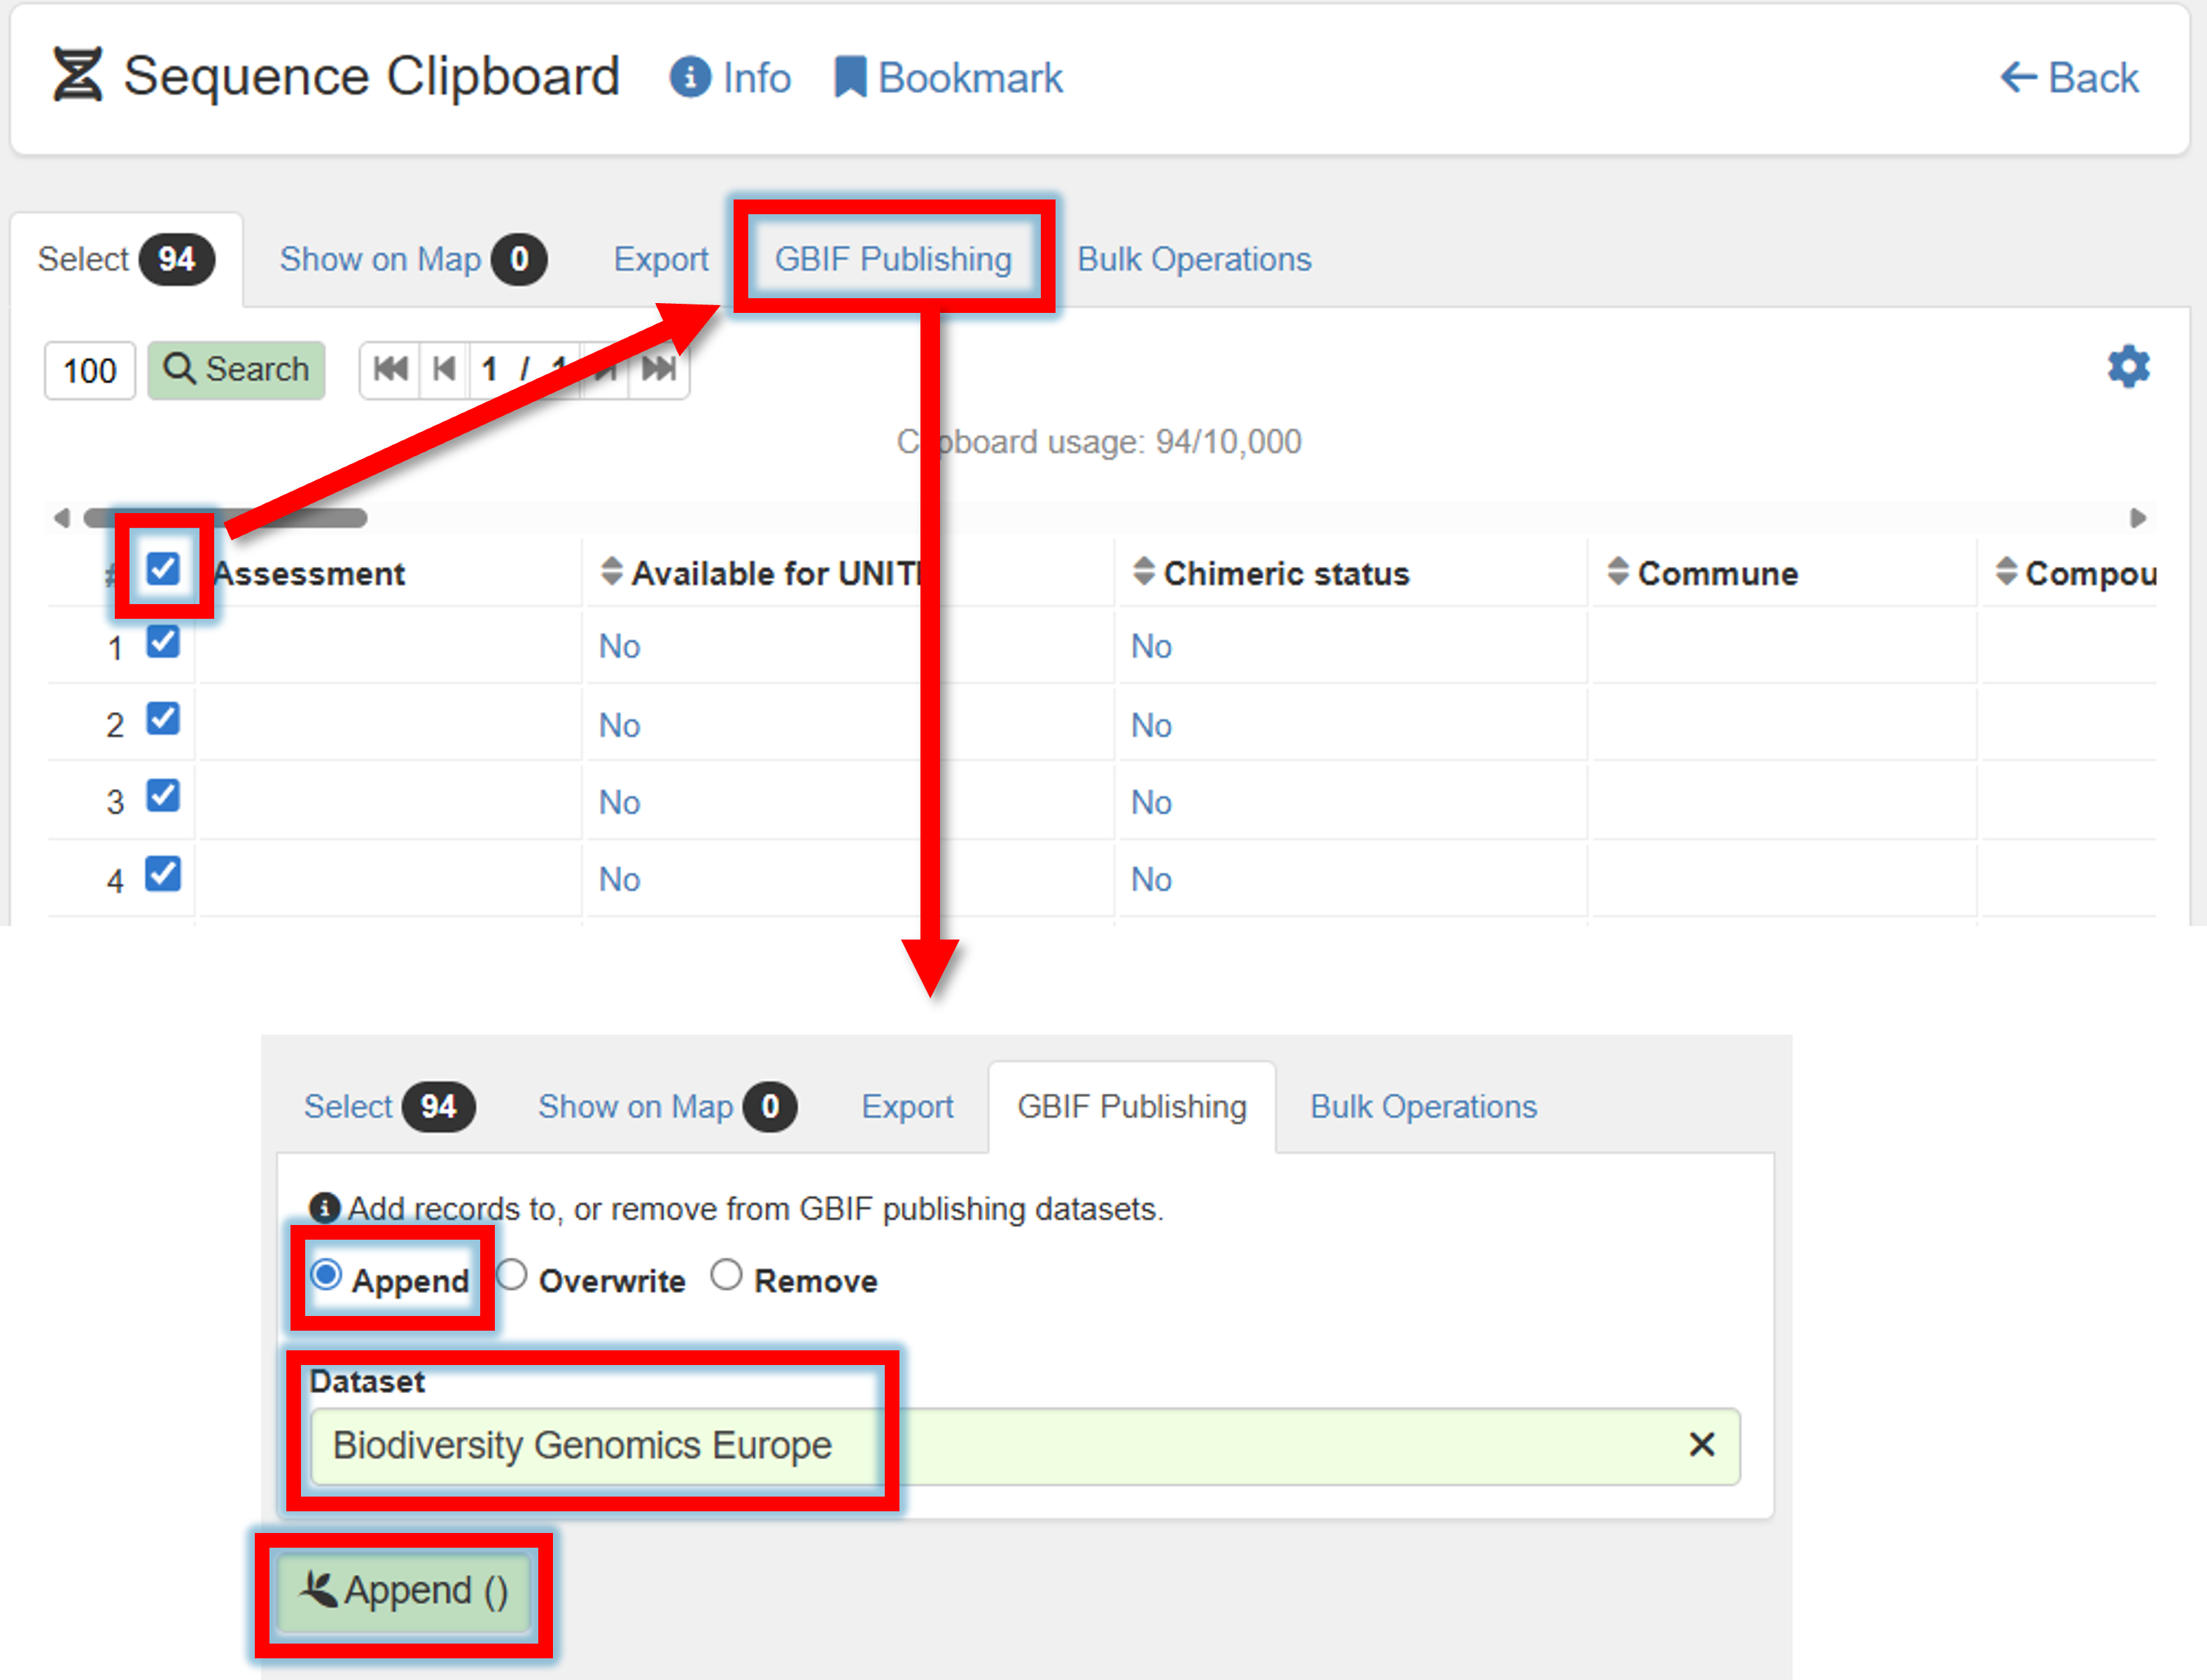
3. Search for your Sequences (metabarcoding features) in PlutoF, and send them to the clipboard.
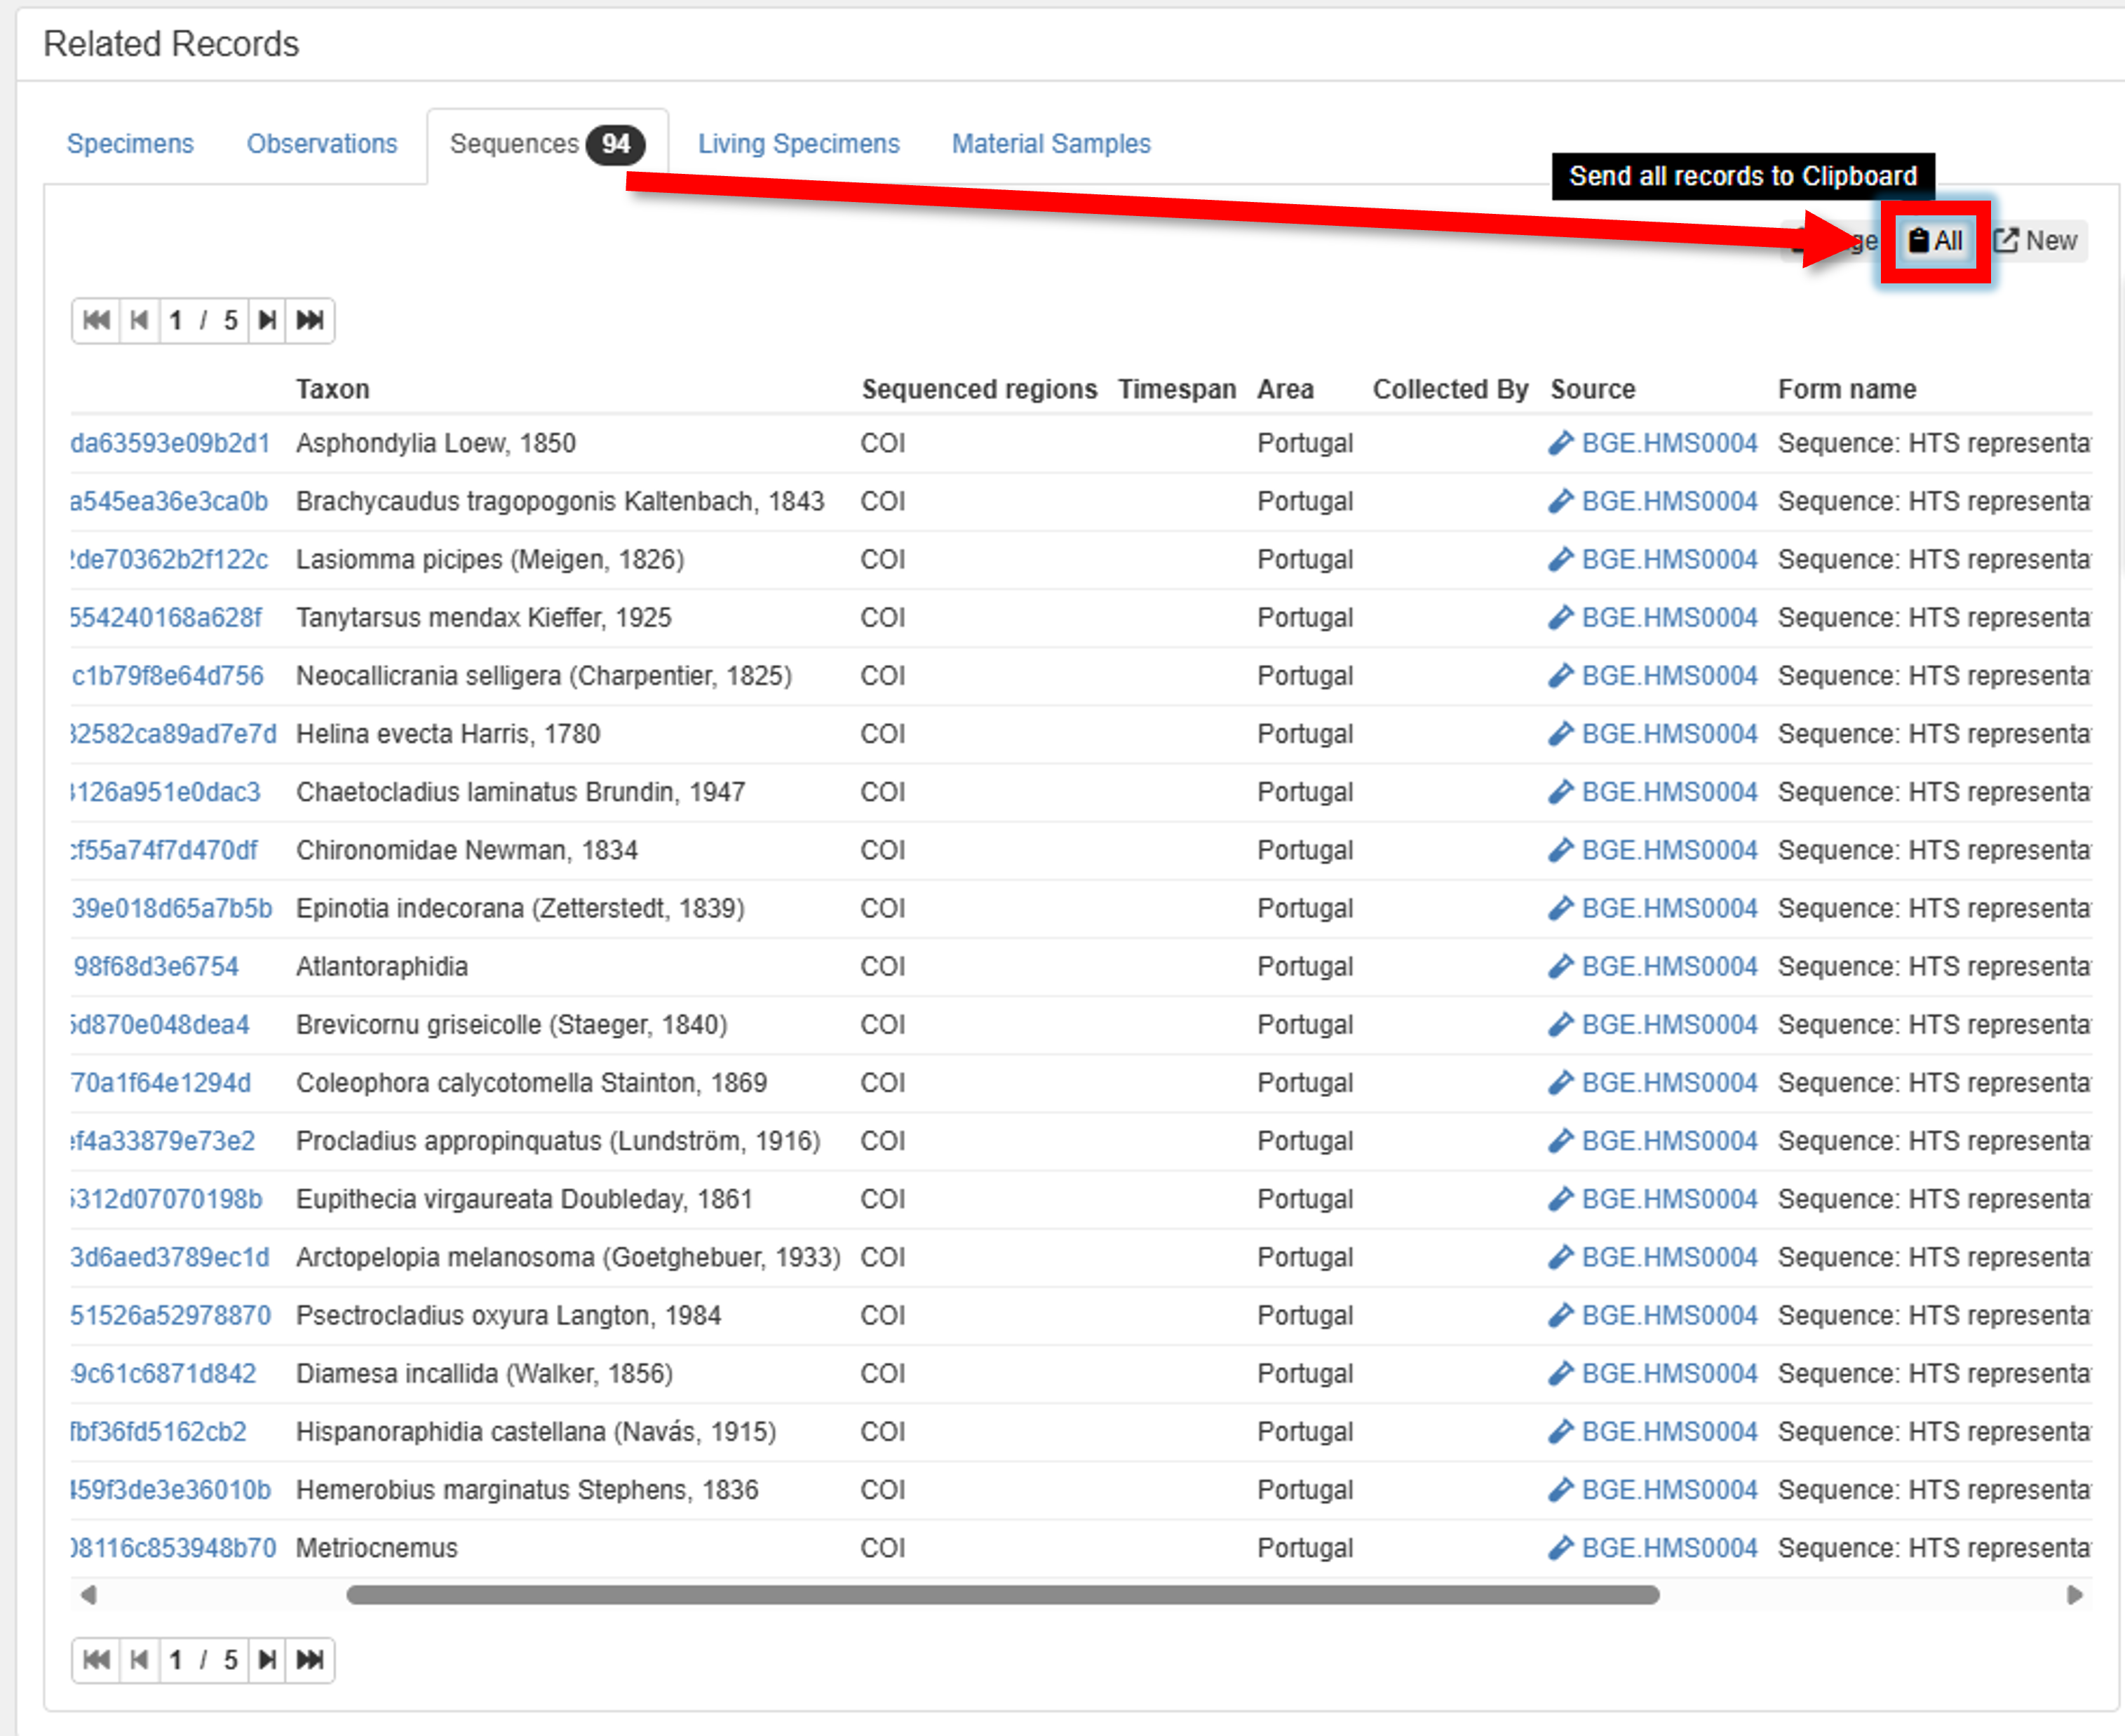
4. Got to Clipboard & Export panel, and click on “Sequences”
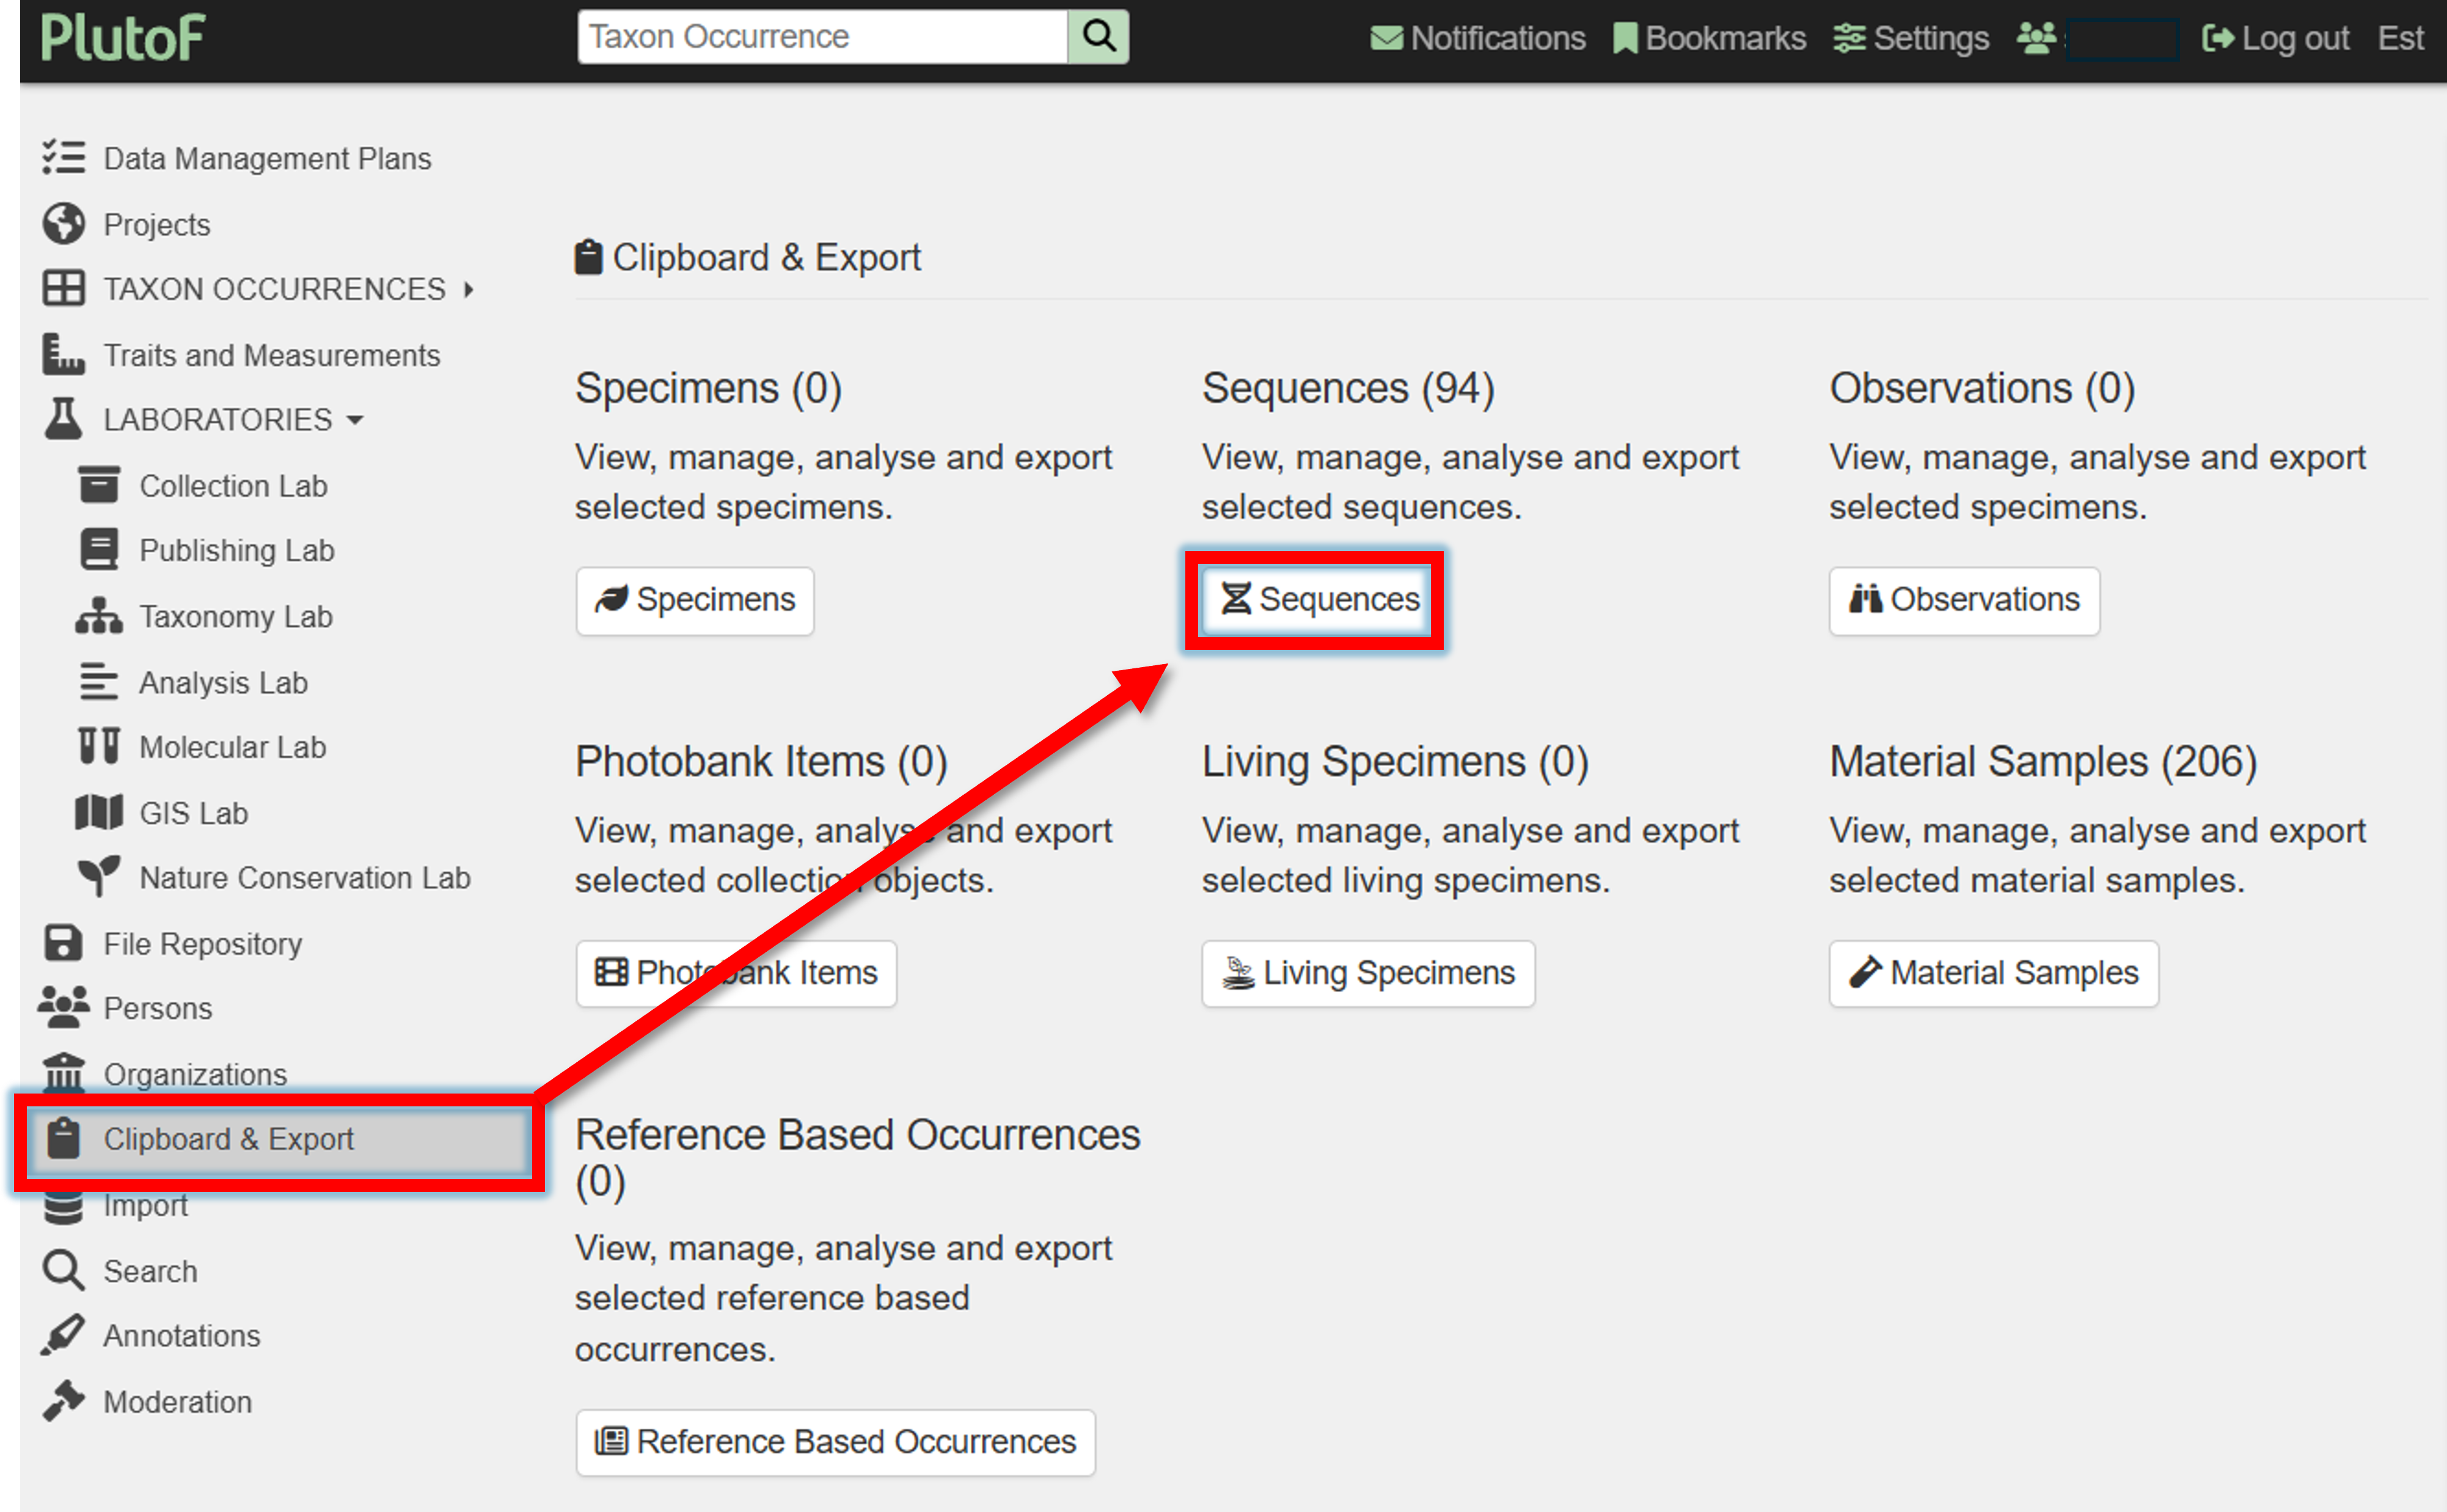
5. Select all (or some) sequences –> GBIF Publishing –> Append/Overwrite –> Specify GBIF dataset
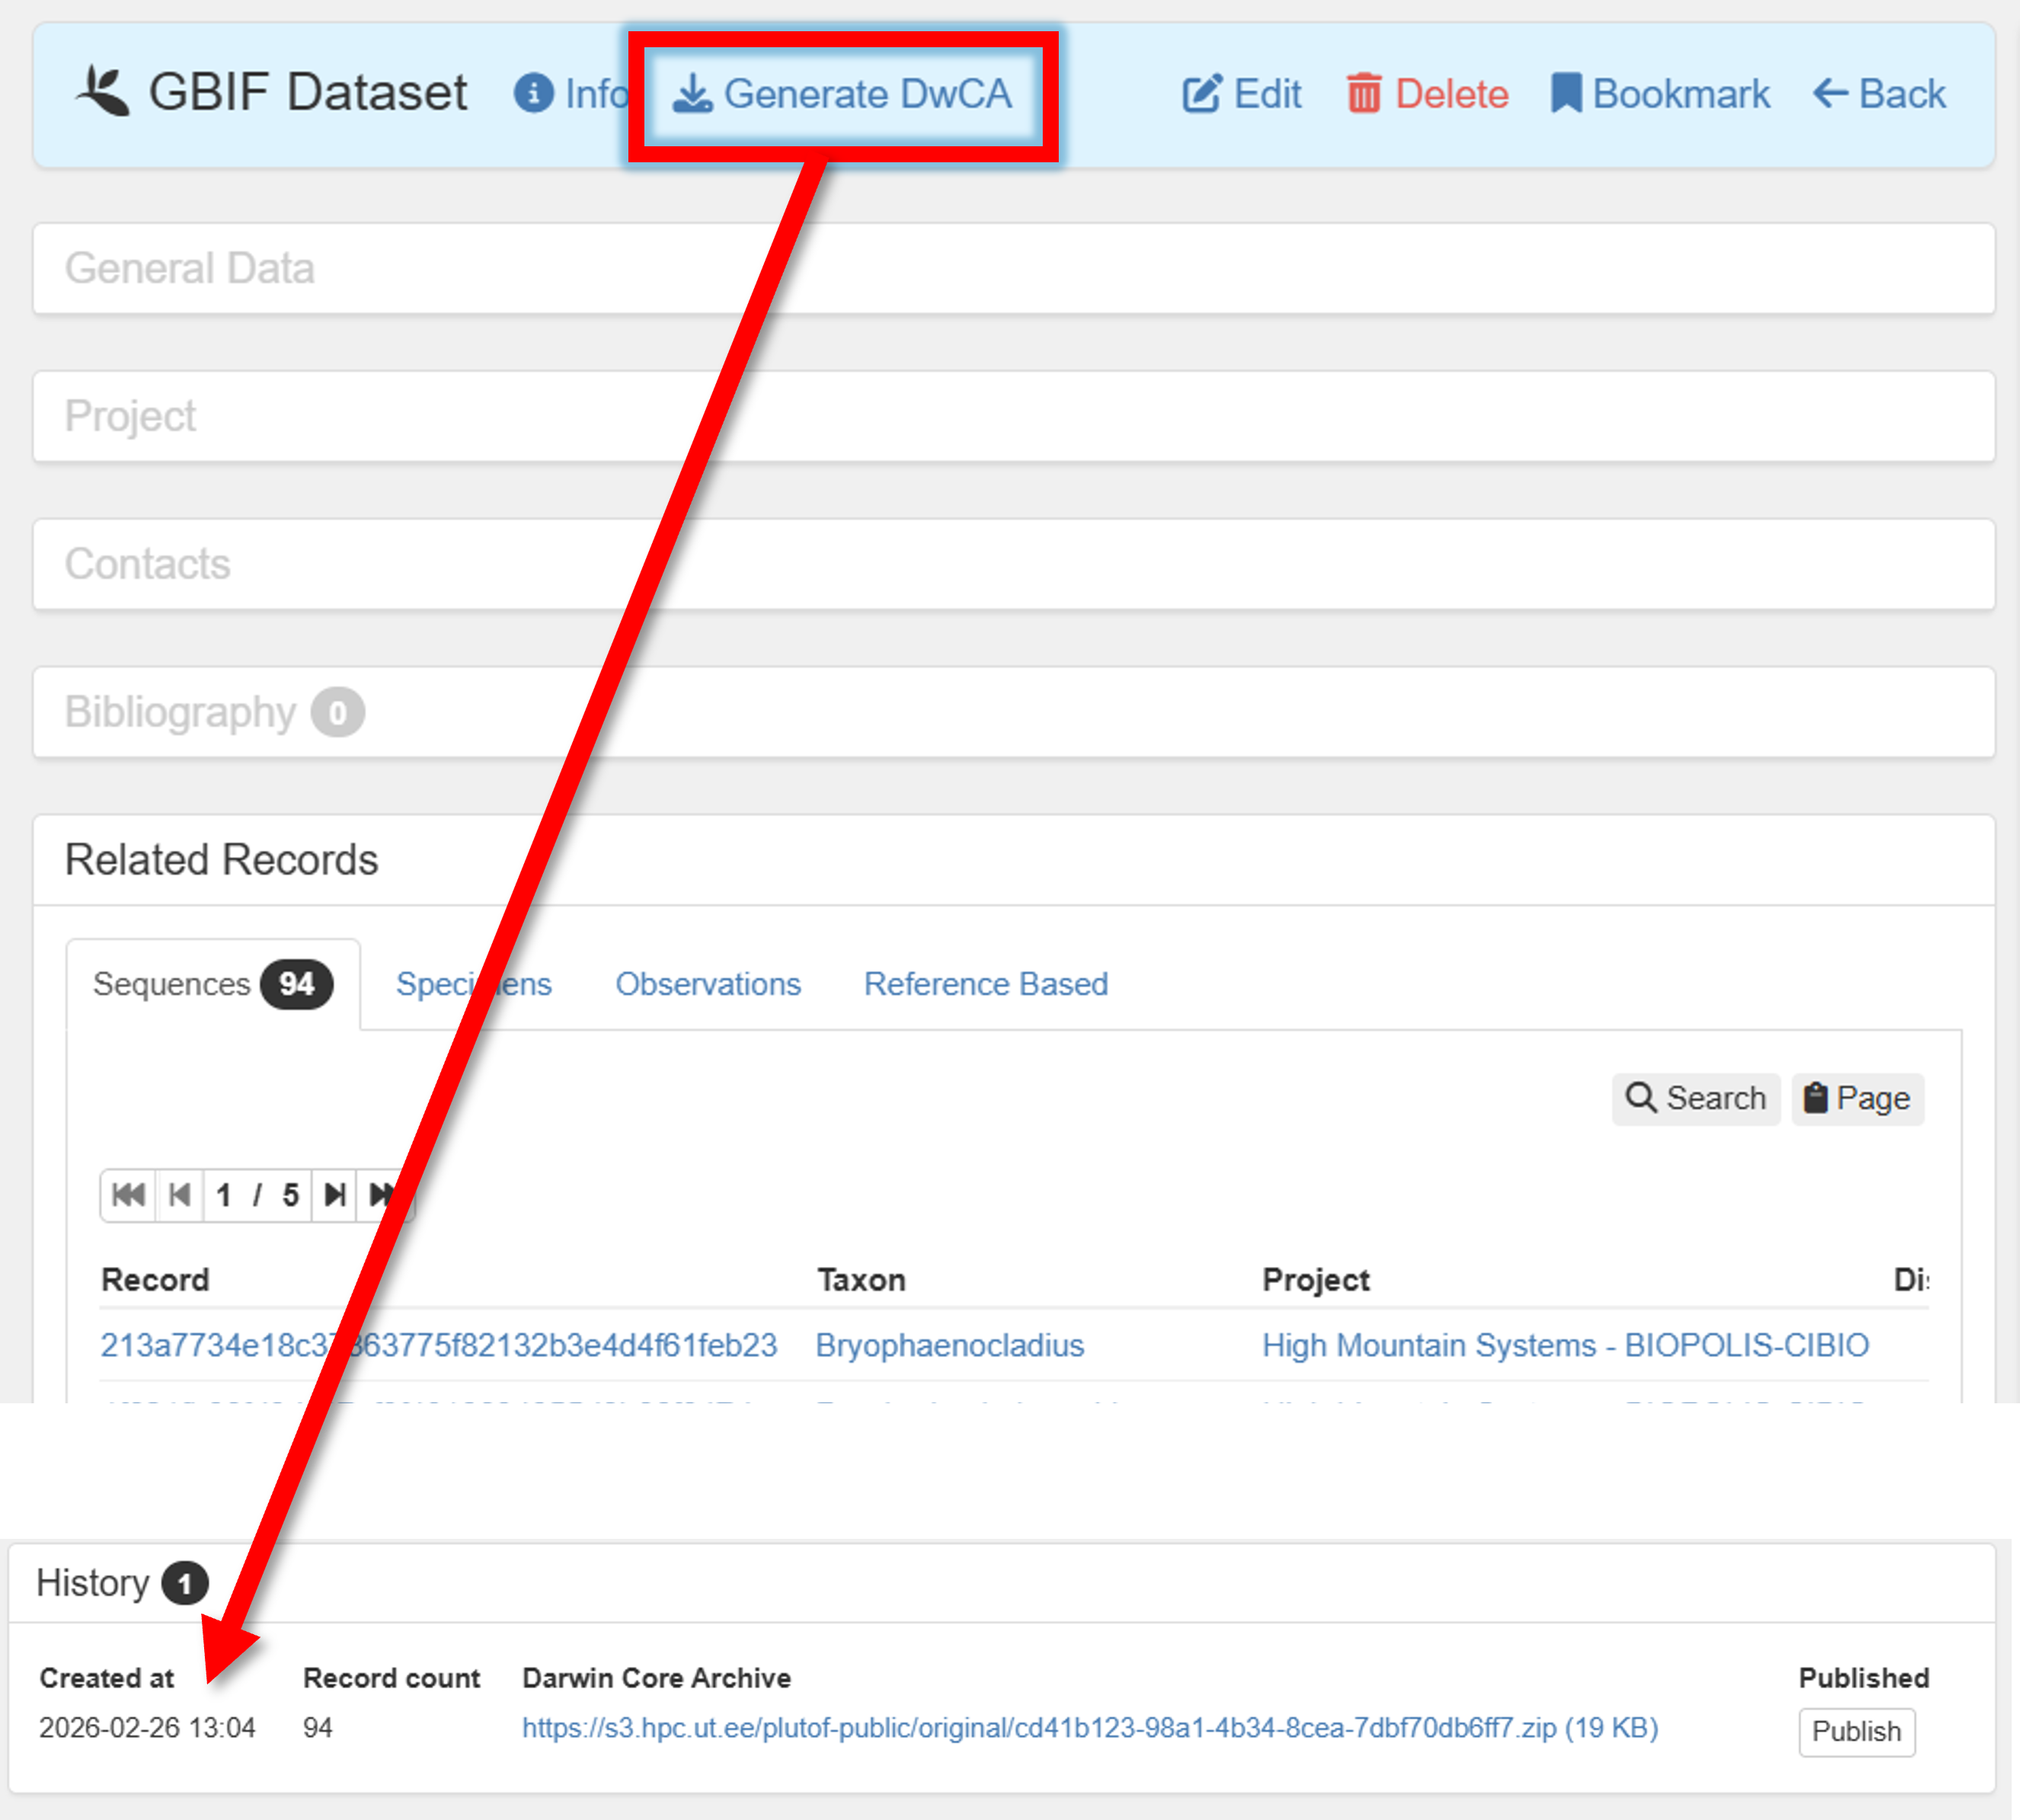
6. Go back to Publishing panel –> GBIF Datasets.
Before publishing, check the dataset that is subjected to publishing in GBIF.
Press in the button
Generate DwCAto generate the Darwin Core Archive (DwCA) file.Download the DwCA file (History panel within current GBIF dataset).
Check if all looks good.
If everything looks good, press in the button Publish to GBIF.
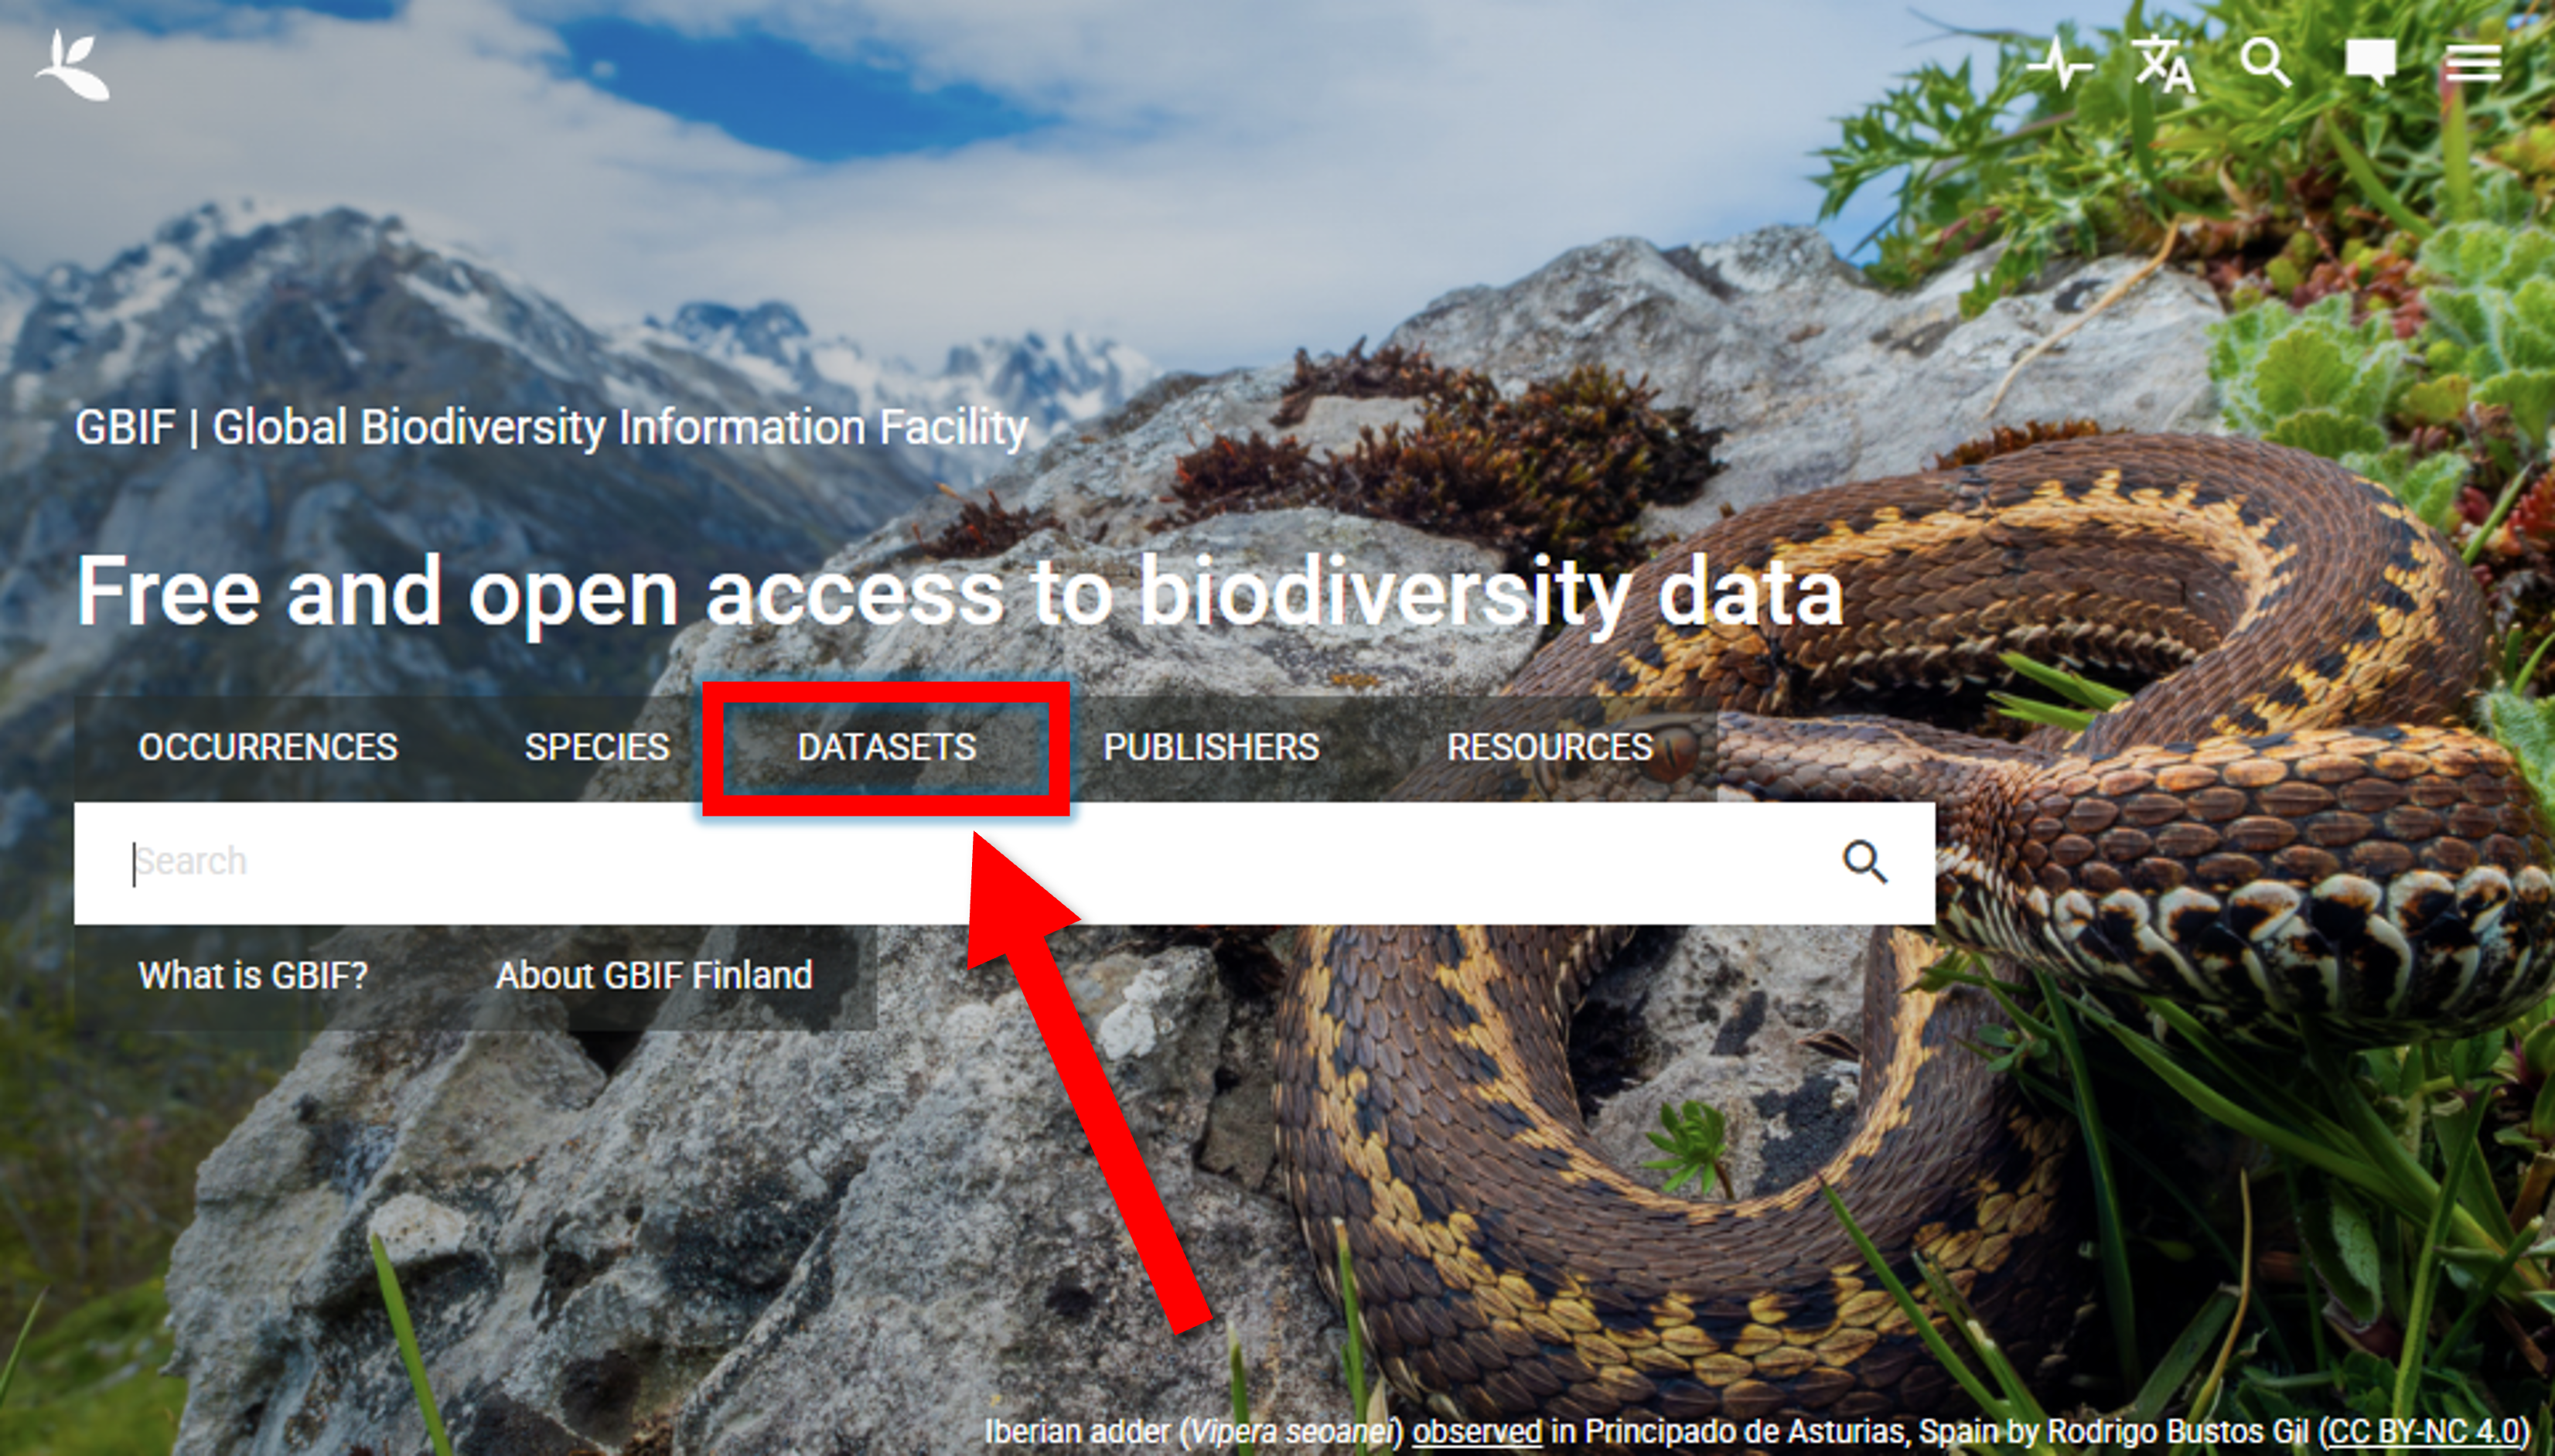
In GBIF, you can access your dataset can be accessed via the DATASETS panel.
![]()

![]()
![]()